

Desk of Contents
- Pytest Tutorial: MLOps Testing, Fixtures, and Locust Load Testing
- Introduction to MLOps Testing: Constructing Dependable ML Techniques with Pytest
- Why Testing Is Non-Negotiable in MLOps
- What You Will Be taught: Pytest, Fixtures, and Load Testing for MLOps
- From FastAPI to Testing: Extending Your MLOps Pipeline with Validation
- Check-Pushed MLOps: Making use of Software program Testing Finest Practices to ML Pipelines
- What to Check in MLOps Pipelines: Fashions, APIs, and Configurations
- Unit vs Integration vs Efficiency Testing
- The Software program Testing Pyramid for MLOps: Unit, Integration, and Load Testing
- Venture Construction and Check Structure
- Check Listing Construction for MLOps: unit, integration, and efficiency
- Understanding Pytest Fixtures: Utilizing conftest.py for Reusable Check Setup
- The place to Place Checks in MLOps Tasks: Unit vs Integration vs Efficiency
- Unit Testing in MLOps with Pytest
- The Code Underneath Check: Inference Service and Dummy Mannequin
- providers/inference_service.py
- fashions/dummy_model.py
- Writing Pytest Unit Checks for MLOps: test_inference_service.py
- Testing the Inference Service with Pytest (MLOps Unit Checks)
- Testing ML Fashions in Isolation with Pytest
- The right way to Run Pytest Unit Checks for MLOps Tasks
- Integration Testing in MLOps
- Utilizing FastAPI TestClient for Integration Testing with Pytest
- How FastAPI TestClient Works for API Testing
- Testing API Endpoints (/well being, /predict)
- What Integration Checks Confirm in an MLOps API
- Testing the /predict Endpoint in an MLOps API
- Testing Documentation Endpoints (/docs, /openapi.json)
- What This Ensures
- Testing Error Dealing with in FastAPI APIs with Pytest
- Integration Check Breakdown: What Every Check Validates
- The right way to Run Integration Checks with Pytest in MLOps
- Efficiency and Load Testing with Locust
- Why Load Testing Is Important for MLOps and ML APIs
- Locust Load Testing Ideas: Customers, Spawn Price, and Duties Defined
- Writing the locustfile.py
- What This Locust Load Check Validates in an MLOps API
- Operating Locust: Headless Mode vs Internet UI Dashboard
- Producing Locust Load Testing Experiences for ML APIs
- Understanding Check Metrics (RPS, failures, latency, P95/P99)
- MLOps Check Configuration: YAML and Atmosphere Variables
- Understanding test_config.yaml for MLOps Testing
- What test_config.yaml Controls in MLOps Pipelines
- Overriding Software Configuration in Check Mode
- How Configuration Overrides Work: YAML and Atmosphere Variables
- Why Configuration Administration Issues in MLOps Testing
- Utilizing Atmosphere Variables for Check Isolation
- Code High quality in MLOps: Linting, Formatting, and Static Evaluation Instruments
- Linting Python Code with flake8
- Formatting Python Code with Black Pipelines
- Utilizing isort to Handle Python Imports
- The right way to Run isort for Clear Python Imports
- Static Kind Checking with MyPy for MLOps Codebases
- Utilizing a Makefile to Automate MLOps Testing and Code High quality
- Automating Testing with a Pytest Check Runner Script
- Operating Automated Checks with run_tests.sh
- Understanding Pytest Output and Check Outcomes
- Why Automated Testing Workflows Matter in MLOps
- Integrating Pytest into CI/CD Pipelines
- Automating Load Testing in MLOps with Locust Scripts
- Operating Automated Locust Load Checks with run_locust.sh
- Routinely Producing Load Testing Experiences for ML APIs
- Getting ready Load Testing for CI/CD and Cloud MLOps Pipelines
- Check Protection in MLOps: Measuring and Enhancing Code Protection
- Utilizing pytest-cov to Measure Check Protection
- The right way to Measure Code Protection in MLOps Tasks
- The right way to Improve Check Protection in MLOps Pipelines
- Advisable Check Protection Targets for MLOps Techniques
- Abstract
Pytest Tutorial: MLOps Testing, Fixtures, and Locust Load Testing
On this lesson, you’ll discover ways to make ML programs dependable, right, and production-ready via structured testing and validation. You’ll stroll via unit checks, integration checks, load and efficiency checks, fixtures, code high quality instruments, and automatic take a look at runs, providing you with every little thing you have to guarantee your ML API behaves predictably below real-world circumstances.
This lesson is the final of a 2-part collection on Software program Engineering for Machine Studying Operations (MLOps):
- FastAPI for MLOps: Python Venture Construction and API Finest Practices
- Pytest Tutorial: MLOps Testing, Fixtures, and Locust Load Testing (this tutorial)
To discover ways to take a look at, validate, and stress-test your ML providers like knowledgeable MLOps engineer, simply maintain studying.
Introduction to MLOps Testing: Constructing Dependable ML Techniques with Pytest
Testing is the spine of dependable MLOps. A mannequin may look nice in a pocket book, however as soon as wrapped in providers, APIs, configs, and infrastructure, dozens of issues can break silently: incorrect inputs, surprising mannequin outputs, lacking atmosphere variables, gradual endpoints, and downstream failures. This lesson ensures you by no means ship these issues into manufacturing.
On this lesson, you’ll study the whole testing workflow for machine studying (ML) programs: from small, remoted unit checks to full API integration checks and cargo testing your endpoints below actual site visitors circumstances. Additionally, you will perceive find out how to construction your checks, how every kind of take a look at suits into the MLOps lifecycle, and find out how to design a take a look at suite that grows cleanly as your challenge evolves.
To discover ways to validate, benchmark, and harden your ML functions for manufacturing, simply maintain studying.
Why Testing Is Non-Negotiable in MLOps
Machine studying provides layers of unpredictability on high of standard software program engineering. Fashions drift, inputs fluctuate, inference latency can enhance, and small code modifications can ripple into main behavioral shifts. With out testing, you haven’t any security web. Correct checks make your system observable, predictable, and secure to deploy.
What You Will Be taught: Pytest, Fixtures, and Load Testing for MLOps
You’ll stroll via a sensible testing workflow tailor-made for ML functions: writing unit checks for inference logic, validating API endpoints end-to-end, utilizing fixtures to isolate environments, verifying configuration habits, and working load checks to know real-world efficiency. Every instance connects on to the codebase you constructed earlier.
From FastAPI to Testing: Extending Your MLOps Pipeline with Validation
Beforehand, you realized find out how to construction a clear ML codebase, configure environments, separate providers, and expose dependable API endpoints. Now, you’ll stress-test that basis. This lesson transforms your structured software right into a validated, production-ready system with checks that catch points earlier than customers ever see them.
Check-Pushed MLOps: Making use of Software program Testing Finest Practices to ML Pipelines
Check-driven improvement (TDD) issues much more in ML as a result of fashions introduce uncertainty on high of regular software program complexity. A single mistake in preprocessing, an incorrect mannequin model, or a gradual endpoint can break your software in methods which might be onerous to detect with out a structured testing technique. Check-driven MLOps provides you a predictable workflow: write checks, run them typically, and let failures information enhancements.
What to Check in MLOps Pipelines: Fashions, APIs, and Configurations
ML programs require testing throughout a number of layers as a result of points can seem wherever: in preprocessing logic, service code, configuration loading, API endpoints, or the mannequin itself. You need to confirm that your inference service behaves appropriately with each legitimate and invalid inputs, that your API returns constant responses, that your configuration behaves as anticipated, and that your complete pipeline works end-to-end. Even when utilizing a dummy mannequin, testing ensures that the construction of your system stays right as the actual mannequin is swapped in later.
Unit vs Integration vs Efficiency Testing
Unit checks concentrate on the smallest items of your system: features, helper modules, and the inference service. They run quick and break shortly when a small change introduces an error. Integration checks validate how parts work collectively: routes, providers, configs, and the FastAPI layer. They guarantee your API behaves persistently it doesn’t matter what modifications contained in the codebase. Efficiency checks simulate actual person site visitors, evaluating latency, throughput, and failure charges below load. Collectively, these 3 sorts of checks create full confidence in your ML software.
The Software program Testing Pyramid for MLOps: Unit, Integration, and Load Testing
The testing pyramid helps prioritize effort: many unit checks on the backside, fewer integration checks within the center, and a small variety of heavy efficiency checks on the high. ML programs particularly profit from this construction as a result of most failures happen in smaller utilities and repair features, not within the ultimate API layer. By weighting your take a look at suite appropriately, you get quick suggestions throughout improvement whereas nonetheless validating your complete system earlier than deployment.
Venture Construction and Check Structure
A clear testing format makes your ML system predictable, scalable, and straightforward to take care of. By separating checks into clear classes (e.g., unit, integration, and efficiency), you make sure that every form of take a look at has a targeted goal and a pure house contained in the repository. This construction additionally mirrors how actual manufacturing MLOps groups arrange their work, making your challenge simpler to increase as your system grows.
Check Listing Construction for MLOps: unit, integration, and efficiency
Your Lesson 2 repository features a devoted checks/ listing with 3 subfolders:
checks/
│── unit/
│── integration/
└── efficiency/
unit/: holds small, quick checks that validate particular person items such because theDummyModel, the inference service, or helper features.integration/: comprises checks that spin up the FastAPI app and confirm endpoints like/well being,/predict, and the OpenAPI docs.efficiency/: contains Locust load testing scripts that simulate actual site visitors hitting your API to measure latency, throughput, and error charges.
This format ensures that every kind of take a look at is separated by intent and runtime value, providing you with a clear option to scale your take a look at suite over time.
Understanding Pytest Fixtures: Utilizing conftest.py for Reusable Check Setup
The conftest.py file is the spine of your testing atmosphere. Pytest mechanically hundreds fixtures outlined right here and makes them out there throughout all take a look at information with out express imports.
Your challenge makes use of conftest.py to supply:
- FastAPI TestClient fixture: permits integration checks to name your API precisely the way in which an actual HTTP consumer would.
- Pattern enter information: retains repeated values out of your take a look at information.
- Anticipated outputs: assist checks keep targeted on habits reasonably than setup.
This shared setup reduces duplication, retains checks clear, and ensures constant take a look at habits throughout your complete suite.
The place to Place Checks in MLOps Tasks: Unit vs Integration vs Efficiency
A easy rule-of-thumb retains your take a look at group disciplined:
- Put checks in unit/ when the code below take a look at doesn’t require a working API or exterior system.
Instance: testing that theDummyModel.predict()returns “constructive” for the phrase nice. - Put checks in integration/ when the take a look at wants the total FastAPI app working.
Instance: calling/predictand checking that the API returns a JSON response. - Put checks in efficiency/ when measuring pace, concurrency limits, or error habits below load.
Instance: Locust scripts simulating dozens of customers sending/predictrequests directly.
Following this sample ensures your checks stay steady, quick, and straightforward to cause about because the challenge grows.
Would you want speedy entry to three,457 pictures curated and labeled with hand gestures to coach, discover, and experiment with … without spending a dime? Head over to Roboflow and get a free account to seize these hand gesture pictures.
Want Assist Configuring Your Improvement Atmosphere?
All that mentioned, are you:
- Brief on time?
- Studying in your employer’s administratively locked system?
- Eager to skip the effort of combating with the command line, bundle managers, and digital environments?
- Able to run the code instantly in your Home windows, macOS, or Linux system?
Then be part of PyImageSearch College at the moment!
Achieve entry to Jupyter Notebooks for this tutorial and different PyImageSearch guides pre-configured to run on Google Colab’s ecosystem proper in your net browser! No set up required.
And better of all, these Jupyter Notebooks will run on Home windows, macOS, and Linux!
Unit Testing in MLOps with Pytest
Unit checks are your first security web in MLOps. Earlier than you hit the API, spin up Locust, or ship to manufacturing, you wish to know: Does my core prediction code behave precisely the way in which I believe it does?
On this lesson, you do this by testing 2 issues in isolation:
- inference service:
providers/inference_service.py - dummy mannequin:
fashions/dummy_model.py
All of that’s captured in checks/unit/test_inference_service.py.
The Code Underneath Check: Inference Service and Dummy Mannequin
First, recall what you might be testing.
providers/inference_service.py
"""
Easy inference service for making mannequin predictions.
"""
from fashions.dummy_model import DummyModel
from core.logger import logger

# Initialize mannequin
mannequin = DummyModel()
logger.data(f"Loaded mannequin: {mannequin.model_name}")


def predict(input_text: str) -> str:
    """
    Make a prediction utilizing the loaded mannequin.

    Args:
        input_text: Enter textual content for prediction

    Returns:
        Prediction outcome as string
    """
    logger.data(f"Making prediction for enter: {input_text[:50]}...")

    attempt:
        prediction = mannequin.predict(input_text)
        logger.data(f"Prediction outcome: {prediction}")
        return prediction
    besides Exception as e:
        logger.error(f"Error throughout prediction: {str(e)}")
        increase
This file does 3 issues:
- Initializes a
DummyModelas soon as at import time and logs that it loaded. - Exposes a
predict(input_text: str) -> stroperate that:- Logs the incoming enter (truncated to 50 chars).
- Calls
mannequin.predict(...). - Logs and returns the prediction.
- Catches any exception, logs the error, and re-raises it so failures are seen.
You aren’t testing FastAPI right here, simply pure Python logic: given some textual content, does this operate persistently return the proper label?
fashions/dummy_model.py
"""
Placeholder dummy mannequin class.
"""
from typing import Any


class DummyModel:
    """
    A placeholder ML mannequin class that returns mounted predictions.
    """

    def __init__(self) -> None:
        """Initialize the dummy mannequin."""
        self.model_name = "dummy_classifier"
        self.model = "1.0.0"

    def predict(self, input_data: Any) -> str:
        """
        Make a prediction (returns a hard and fast string for demonstration).

        Args:
            input_data: Enter information for prediction

        Returns:
            Mounted prediction string
        """
        textual content = str(input_data).decrease()
        if "good" in textual content or "nice" in textual content:
            return "constructive"
        return "unfavorable"
This mannequin is intentionally easy:
- The constructor units
model_nameandmodelfor logging and model monitoring. - The
predict()methodology:- Converts any enter to lowercase textual content.
- Returns
"constructive"if it sees"good"or"nice"within the textual content. - Returns
"unfavorable"in any other case.
Your unit checks will assert that each the service and mannequin behave precisely like this.
Writing Pytest Unit Checks for MLOps: test_inference_service.py
Right here is the total unit take a look at module:
"""
Unit checks for the inference service.
"""
import pytest
from providers.inference_service import predict
from fashions.dummy_model import DummyModel


class TestInferenceService:
    """Check class for inference service."""

    def test_predict_returns_string(self):
        """Check that predict() returns a string."""
        outcome = predict("some enter textual content")
        assert isinstance(outcome, str)

    def test_predict_positive_input(self):
        """Check prediction with constructive enter."""
        outcome = predict("That is good")
        assert outcome == "constructive"

    def test_predict_negative_input(self):
        """Check prediction with unfavorable enter."""
        outcome = predict("That is unhealthy")
        assert outcome == "unfavorable"


class TestDummyModel:
    """Check class for DummyModel."""

    def test_model_initialization(self):
        """Check that the mannequin initializes appropriately."""
        mannequin = DummyModel()
        assert mannequin.model_name == "dummy_classifier"
        assert mannequin.model == "1.0.0"

    def test_predict_with_good_word(self):
        """Check that the mannequin returns constructive for 'good'."""
        mannequin = DummyModel()
        outcome = mannequin.predict("That is good")
        assert outcome == "constructive"

    def test_predict_with_great_word(self):
        """Check that the mannequin returns constructive for 'nice'."""
        mannequin = DummyModel()
        outcome = mannequin.predict("That is nice")
        assert outcome == "constructive"

    def test_predict_without_keywords(self):
        """Check that the mannequin returns unfavorable with out key phrases."""
        mannequin = DummyModel()
        test_inputs = ["test", "random text", "negative sentiment"]
        for input_text in test_inputs:
            outcome = mannequin.predict(input_text)
            assert outcome == "unfavorable"
Allow us to break it down.
Testing the Inference Service with Pytest (MLOps Unit Checks)
The primary take a look at class focuses on the service operate, not the API:
class TestInferenceService:
    """Check class for inference service."""

    def test_predict_returns_string(self):
        """Check that predict() returns a string."""
        outcome = predict("some enter textual content")
        assert isinstance(outcome, str)
- This take a look at ensures
predict()at all times returns a string, it doesn’t matter what you move in. - If somebody later modifications
predict()to return a dict, tuple, or Pydantic mannequin, this take a look at will fail instantly.
    def test_predict_positive_input(self):
        """Check prediction with constructive enter."""
        outcome = predict("That is good")
        assert outcome == "constructive"

    def test_predict_negative_input(self):
        """Check prediction with unfavorable enter."""
        outcome = predict("That is unhealthy")
        assert outcome == "unfavorable"
These 2 checks confirm the happy-path habits:
- Textual content containing
"good"needs to be labeled as"constructive". - Textual content with out
"good"or"nice"ought to default to"unfavorable".
Discover what’s not taking place right here:
- No FastAPI consumer.
- No HTTP calls.
- No atmosphere or config loading.
That is pure, quick, deterministic testing of the core service logic.
Testing ML Fashions in Isolation with Pytest
The second take a look at class targets the mannequin immediately:
class TestDummyModel:
    """Check class for DummyModel."""

    def test_model_initialization(self):
        """Check that the mannequin initializes appropriately."""
        mannequin = DummyModel()
        assert mannequin.model_name == "dummy_classifier"
        assert mannequin.model == "1.0.0"
- This verifies that your mannequin is initialized appropriately.
- In actual initiatives, this may embody loading weights, establishing gadgets, or configuration. Right here, it’s simply
model_nameandmodel, however the sample is identical.
    def test_predict_with_good_word(self):
        """Check that the mannequin returns constructive for 'good'."""
        mannequin = DummyModel()
        outcome = mannequin.predict("That is good")
        assert outcome == "constructive"

    def test_predict_with_great_word(self):
        """Check that the mannequin returns constructive for 'nice'."""
        mannequin = DummyModel()
        outcome = mannequin.predict("That is nice")
        assert outcome == "constructive"
- These checks assert that the keyword-based classification logic works: each
"good"and"nice"map to"constructive".
    def test_predict_without_keywords(self):
        """Check that the mannequin returns unfavorable with out key phrases."""
        mannequin = DummyModel()
        test_inputs = ["test", "random text", "negative sentiment"]
        for input_text in test_inputs:
            outcome = mannequin.predict(input_text)
            assert outcome == "unfavorable"
- This take a look at loops over a number of impartial and unfavorable phrases to ensure the mannequin persistently returns “unfavorable” when no constructive key phrases are current.
- That is your guardrail in opposition to unintended modifications to the key phrase logic.
The right way to Run Pytest Unit Checks for MLOps Tasks
To run simply these checks:
pytest checks/unit/ -v
Or with Poetry:
poetry run pytest checks/unit/ -v
You will note output just like:
checks/unit/test_inference_service.py::TestInferenceService::test_predict_returns_string PASSED
checks/unit/test_inference_service.py::TestInferenceService::test_predict_positive_input PASSED
checks/unit/test_inference_service.py::TestInferenceService::test_predict_negative_input PASSED
checks/unit/test_inference_service.py::TestDummyModel::test_model_initialization PASSED
...
When every little thing is inexperienced, :
- Your core prediction logic is steady.
- The dummy mannequin behaves precisely as designed.
- Now you can safely transfer on to integration checks and efficiency checks in later sections.
Integration Testing in MLOps
Unit checks validate your core Python logic, however integration checks reply a special query:
“Does your complete software behave appropriately when all parts work collectively?”
This implies testing:
- FastAPI app
- routing layer
- service features
- mannequin
- configuration loaded at runtime
All of this occurs utilizing FastAPI’s TestClient and your precise working software object (app from important.py).
Let’s break it down.
Utilizing FastAPI TestClient for Integration Testing with Pytest
Your conftest.py defines a reusable consumer fixture:
from fastapi.testclient import TestClient
from important import app

@pytest.fixture
def consumer():
    """Create a take a look at consumer for the FastAPI app."""
    return TestClient(app)
How FastAPI TestClient Works for API Testing
TestClient(app)spins up an in-memory FastAPI occasion.- No server is launched, no networking happens.
- Each take a look at receives a recent consumer that behaves precisely like an actual HTTP consumer or API client.
This allows you to write code akin to:
response = consumer.get("/well being")
as when you have been calling an actual deployed API, however completely offline and deterministic.
Testing API Endpoints (/well being, /predict)
Right here is the combination take a look at code out of your repo:
class TestHealthEndpoint:
    def test_health_check_returns_ok(self, consumer):
        response = consumer.get("/well being")

        assert response.status_code == 200
        assert response.json() == {"standing": "okay"}

    def test_health_check_has_correct_content_type(self, consumer):
        response = consumer.get("/well being")

        assert response.status_code == 200
        assert "software/json" in response.headers["content-type"]
What Integration Checks Confirm in an MLOps API
- Your
/well beingroute is reachable. - It at all times returns a 200 response.
- It returns legitimate JSON.
- The content material kind is right.
Right here is the actual FastAPI code being examined (important.py):
@app.get("/well being")
async def health_check():
    logger.data("Well being verify requested")
    return {"standing": "okay"}
This alignment is precisely right.
Testing the /predict Endpoint in an MLOps API
Your integration checks name the prediction endpoint:
class TestPredictEndpoint:

    def test_predict_endpoint(self, consumer):
        response = consumer.put up("/predict", params={"enter": "good film"})
        assert response.status_code == 200
        assert "prediction" in response.json()

    def test_predict_positive(self, consumer):
        response = consumer.put up("/predict", params={"enter": "This can be a nice film!"})
        assert response.status_code == 200
        assert response.json()["prediction"] == "constructive"

    def test_predict_negative(self, consumer):
        response = consumer.put up("/predict", params={"enter": "That is unhealthy"})
        assert response.status_code == 200
        assert response.json()["prediction"] == "unfavorable"
This checks:
- The endpoint exists and accepts POST requests.
- The parameter is appropriately handed utilizing
params={"enter": ...}. - The inner inference logic (service → mannequin) behaves appropriately end-to-end.
Right here is the precise API endpoint in your important.py:
@app.put up("/predict")
async def predict_route(enter: str):
    return {"prediction": predict_service(enter)}
Good 1:1 match.
Testing Documentation Endpoints (/docs, /openapi.json)
These are constructed into FastAPI and should exist for manufacturing ML programs.
Your checks:
class TestAPIDocumentation:
    def test_openapi_schema_accessible(self, consumer):
        response = consumer.get("/openapi.json")

        assert response.status_code == 200
        schema = response.json()
        assert "openapi" in schema
        assert "data" in schema

    def test_swagger_ui_accessible(self, consumer):
        response = consumer.get("/docs")

        assert response.status_code == 200
        assert "textual content/html" in response.headers["content-type"]
What This Ensures
- The OpenAPI schema is generated.
- Swagger UI hundreds efficiently.
- No misconfiguration broke the docs.
- Shoppers (frontend groups, different ML providers, monitoring) can introspect your API.
That is normal for manufacturing ML programs.
Testing Error Dealing with in FastAPI APIs with Pytest
Your code contains error checks that confirm robustness:
class TestErrorHandling:
    def test_nonexistent_endpoint_returns_404(self, consumer):
        response = consumer.get("/nonexistent")
        assert response.status_code == 404

    def test_invalid_method_on_health_endpoint(self, consumer):
        response = consumer.put up("/well being")
        assert response.status_code == 405  # Technique Not Allowed

    def test_malformed_requests_handled_gracefully(self, consumer):
        response = consumer.get("/well being")
        assert response.status_code == 200
Integration Check Breakdown: What Every Check Validates
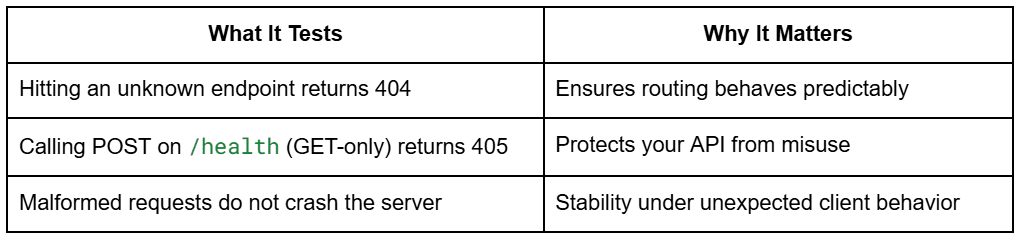
These checks guarantee your service behaves persistently even when shoppers behave incorrectly.
The right way to Run Integration Checks with Pytest in MLOps
To run solely the combination checks:
Utilizing pytest immediately
pytest checks/integration/ -v
With Poetry
poetry run pytest checks/integration/ -v
With Makefile
make test-integration
You will note output like:
checks/integration/test_api_routes.py::TestHealthEndpoint::test_health_check_returns_ok PASSED
checks/integration/test_api_routes.py::TestPredictEndpoint::test_predict_positive PASSED
checks/integration/test_api_routes.py::TestAPIDocumentation::test_swagger_ui_accessible PASSED
...
Inexperienced = your API works appropriately end-to-end.
Efficiency and Load Testing with Locust
Efficiency testing is vital for ML programs as a result of even a light-weight mannequin can turn out to be gradual, unstable, or unresponsive when many customers hit the API directly. With Locust, you may simulate lots of or 1000’s of concurrent customers calling your ML inference endpoints and measure how your API behaves below stress.
This part explains why load testing issues, how Locust works, how your precise take a look at file is structured, and find out how to interpret its outcomes.
Why Load Testing Is Important for MLOps and ML APIs
ML inference providers have distinctive scaling behaviors:
- Mannequin loading requires vital reminiscence.
- Inference latency grows non-linearly below load.
- CPU/GPU bottlenecks present up solely when a number of customers hit the system.
- Thread hunger may cause cascading failures.
- Autoscaling choices rely on real-world load patterns.
A service that performs properly for one person might fail miserably at 50 customers.
Load testing ensures:
- The API stays responsive below site visitors.
- Latency stays below acceptable thresholds.
- No surprising failures or timeouts happen.
- You perceive the system’s scaling limits earlier than going to manufacturing.
Locust is ideal for this as a result of it’s light-weight, Python-based, and designed for net APIs.
Locust Load Testing Ideas: Customers, Spawn Price, and Duties Defined
Locust simulates person habits utilizing easy Python lessons.
Customers
A “person” is an unbiased consumer that repeatedly makes requests to your API.
Instance:
- 10 customers = 10 lively shoppers repeatedly calling
/predict.
Spawn charge
How shortly Locust ramps up customers.
Instance:
- spawn charge 2 = add 2 customers per second till goal is reached.
This helps simulate reasonable site visitors spikes as a substitute of immediately launching all customers.
Duties
Every simulated person executes a set of duties (e.g., repeatedly calling the /predict endpoint).
Each process can have a weight:
- Greater weight = extra frequent calls.
This allows you to mimic actual person patterns like:
- 90% predict calls
- 10% well being checks
Your challenge does precisely this.
Writing the locustfile.py
from locust import HttpUser, process, between

class MLAPIUser(HttpUser):
    """
    Locust person class for testing the ML API.

    Simulates a person making requests to the API endpoints.
    """

    # Wait between 1 and three seconds between requests
    wait_time = between(1, 3)

    @process(10)
    def test_predict(self):
        """
        Check the predict endpoint.

        This process has weight 10, making it essentially the most incessantly known as.
        """
        payload = {"enter": "The film was good"}
        with self.consumer.put up("/predict", params=payload, catch_response=True) as response:
            if response.status_code == 200:
                response_data = response.json()
                if "prediction" in response_data:
                    response.success()
                else:
                    response.failure(f"Lacking prediction in response: {response_data}")
            else:
                response.failure(f"HTTP {response.status_code}")

    def on_start(self):
        """
        Known as when a person begins testing.

        Used for setup duties like authentication.
        """
        # Confirm the API is reachable
        response = self.consumer.get("/well being")
        if response.status_code != 200:
            print(f"Warning: API well being verify failed with standing {response.status_code}")
What This Locust Load Check Validates in an MLOps API
- Creates a simulated person (MLAPIUser) that calls
/predict. - Provides the
/predictprocess a weight of 10, making it the dominant request. - Sends reasonable enter (“The film was good”).
- Validates:
- Response code is 200.
- JSON comprises “prediction”.
- Marks failures explicitly for clear reporting.
- On startup, every person verifies that
/well beingworks.
This matches your API completely:
/predictis POST with question parameterenter=.../well beingis GET and returns standing OK
Nothing must be modified; that is production-quality.
Operating Locust: Headless Mode vs Internet UI Dashboard
Locust helps two modes.
A. Internet UI Mode (Interactive Dashboard)
Launch Locust:
locust -f checks/efficiency/locustfile.py --host=http://localhost:8000
Then open:
http://localhost:8089
You will note a dashboard the place you may:
- Set variety of customers
- Set spawn charge
- Begin/cease checks
- View real-time stats
B. Headless Mode (Automated CI/CD or scripting)
You have already got a script:
software-engineering-mlops-lesson2/scripts/run_locust.sh
Run:
./scripts/run_locust.sh http://localhost:8000 10 2 5m
This executes:
- 10 customers
- spawn charge 2 customers per second
- run time 5 minutes
- save HTML report
No UI; excellent for pipelines.
Producing Locust Load Testing Experiences for ML APIs
Your script makes use of:
--html="reviews/locust_reports/locust_report_<timestamp>.html"
Which produces information like:
reviews/locust_reports/locust_report_20251030_031331.html
Every report contains:
- Requests per second (RPS)
- Failure stats
- Full latency distribution
- Percentiles (fiftieth, ninety fifth, 99th)
- Charts of lively customers and response occasions
These HTML reviews are nice for:
- Evaluating deployments
- Regression testing API efficiency
- Flagging gradual mannequin variations
- Archiving efficiency historical past
The whole lot is already appropriately arrange in your repo.
Understanding Check Metrics (RPS, failures, latency, P95/P99)
Locust provides a number of efficiency metrics you will need to perceive for ML programs.
Requests per Second (RPS)
What number of inference calls your API can deal with per second.
- CPU-bound fashions result in low RPS
- Easy fashions result in excessive RPS
Rising customers will present the place your mannequin and server saturates.
Failures
Locust marks a request as failed when:
- Standing code ≠ 200
- Response JSON doesn’t comprise “prediction”
- Timeout happens
- Server returns an inside error
Your catch_response=True logic handles this explicitly.
This prevents “hidden” failures.
Latency (ms)
Response time per request, sometimes measured in milliseconds.
For ML, latency is crucial metric.
You will note:
- Common latency
- Median (P50)
- Slowest (max latency)
P95 / P99 (Tail Latency)
The ninety fifth and 99th percentile response occasions.
These seize worst-case habits.
Instance:
- P50 = 40 ms
- P95 = 210 ms
- P99 = 540 ms
This implies:
Most customers see quick responses, however a small % expertise main slowdowns.
That is frequent in ML workloads resulting from:
- Mannequin warmup
- Thread rivalry
- Python GIL blockage
- Mannequin cache misses
Manufacturing SLOs normally monitor P95 and P99, not averages.
MLOps Check Configuration: YAML and Atmosphere Variables
ML programs behave in a different way throughout manufacturing, improvement, and testing environments.
Your Lesson 2 codebase separates these environments cleanly utilizing:
- A test-specific YAML config
- A modified BaseSettings loader
.envoverrides for take a look at mode
This ensures that checks run shortly, deterministically, and with out polluting actual atmosphere settings.
Let’s break down how this works.
Understanding test_config.yaml for MLOps Testing
# Check Configuration
atmosphere: "take a look at"
log_level: "DEBUG"

# API Configuration
api_host: "127.0.0.1"
api_port: 8000
debug: true

# Efficiency Testing
efficiency:
  baseline_users: 10
  spawn_rate: 2
  test_duration: "5m"

# Mannequin Configuration
mannequin:
  title: "dummy_classifier"
  model: "1.0.0"
What test_config.yaml Controls in MLOps Pipelines
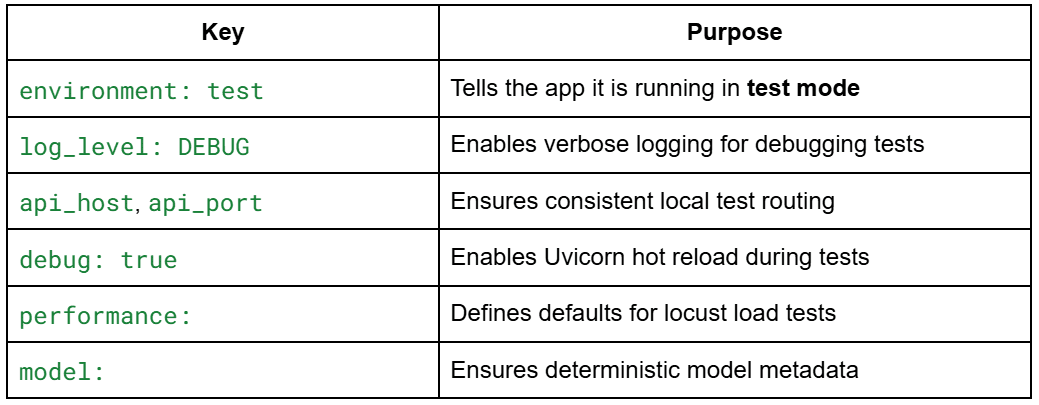
This config prevents checks from by chance choosing up manufacturing configs.
Overriding Software Configuration in Check Mode
Your take a look at atmosphere makes use of a particular configuration loader inside:
core/config.py
Right here is the actual code:
def load_config() -> Settings:
    # Load base settings from atmosphere
    settings = Settings()

    # Load extra configuration from YAML if it exists
    config_path = "configs/test_config.yaml"
    if os.path.exists(config_path):
        yaml_config = load_yaml_config(config_path)

        # Override settings with YAML values in the event that they exist
        for key, worth in yaml_config.gadgets():
            if hasattr(settings, key):
                setattr(settings, key, worth)

    return settings
How Configuration Overrides Work: YAML and Atmosphere Variables
- Step 1:
BaseSettingshundreds atmosphere variables
(.env, working system (OS) variables, defaults) - Step 2: YAML configuration overrides them
test_config.yamlreplaces any matching fields inSettings. - Ultimate output:
The applying is now in take a look at mode, fully remoted from improvement and manufacturing environments.
Why Configuration Administration Issues in MLOps Testing
- Integration checks at all times use the identical port, host, and log settings.
- Checks are repeatable and deterministic.
- You by no means by chance load manufacturing API keys or endpoints.
- CI/CD pipelines get constant habits.
This sample is quite common in real-world MLOps programs.
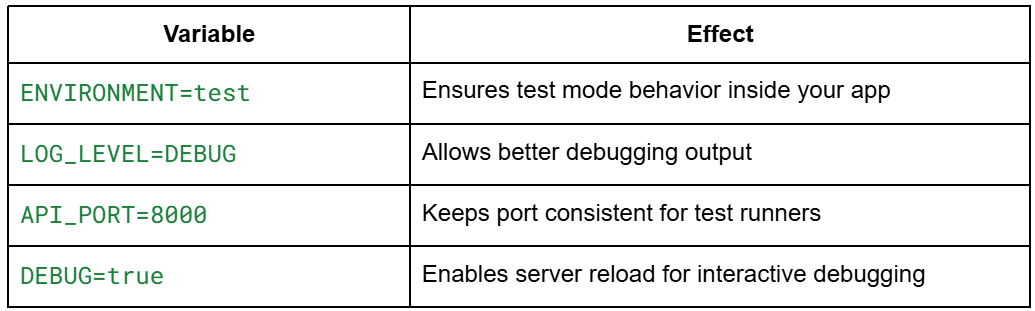
Utilizing Atmosphere Variables for Check Isolation
Your take a look at atmosphere makes use of a .env.instance file:
# API Configuration
API_PORT=8000
API_HOST=0.0.0.0
DEBUG=true

# Atmosphere
ENVIRONMENT=take a look at

# Logging
LOG_LEVEL=DEBUG
Throughout setup, customers run:
cp .env.instance .env
This creates the .env used throughout checks.
Why test-specific .env variables matter
Mixed with YAML overrides:
.env → applies defaults
test_config.yaml → overrides ultimate values
This provides you a versatile and secure configuration stack.
Code High quality in MLOps: Linting, Formatting, and Static Evaluation Instruments
Testing ensures correctness, however code high quality instruments be certain that your ML system stays maintainable because it grows.
In Lesson 2, you introduce a full suite of professional-quality tooling:
- flake8 for linting
- Black for auto-formatting
- isort for import ordering
- MyPy for static typing
- Makefile automation for consistency
Collectively, they implement the identical engineering self-discipline used on actual manufacturing ML groups at scale.
Linting Python Code with flake8
Linting catches code smells, stylistic points, and refined bugs earlier than they hit manufacturing.
Your repository features a actual .flake8 file:
[flake8]
max-line-length = 88
extend-ignore = E203, W503
exclude =
    .git,
    __pycache__,
    .venv,
    venv,
    env,
    construct,
    dist,
    *.egg-info,
    .pytest_cache,
    .mypy_cache
per-file-ignores =
    __init__.py:F401
max-complexity = 10
What your flake8 setup enforces:
- 88-character line restrict (matches Black)
- Ignores stylistic warnings that Black additionally overrides (E203,W503)
- Avoids checking generated or virtual-env directories
- Permits unused imports solely in __init__.py information
- Enforces a most complexity rating of 10
Run flake8 manually:
poetry run flake8 .
Or through Makefile:
make lint
Linting turns into a part of your day-to-day workflow and prevents model drift throughout your ML providers.
Formatting Python Code with Black Pipelines
Black is an automated code formatter; it rewrites Python code right into a constant model.
Your Lesson 2 pyproject.toml contains:
[tool.black]
line-length = 88
target-version = ['py39']
embody=".pyi?$"
This implies:
- All Python information (
.py) are formatted. - Max line size is 88 chars.
py39syntax is allowed.
Format all code:
poetry run black .
Or utilizing the Makefile shortcut:
make format
Black removes tedious choices about spacing, commas, and line breaks, making certain all contributors share the identical model.
Utilizing isort to Handle Python Imports
isort mechanically manages import sorting and grouping.
Your pyproject.toml comprises:
[tool.isort]
profile = "black"
multi_line_output = 3
This aligns isort’s output with Black’s formatting guidelines, avoiding conflicts.
The right way to Run isort for Clear Python Imports
poetry run isort .
Or through Makefile:
make format
Why This Issues
As ML providers develop, import lists turn out to be messy. isort retains them clear and constant, bettering readability exponentially.
Static Kind Checking with MyPy for MLOps Codebases
Static typing is more and more vital in MLOps programs, particularly when passing fashions, configs, and information buildings between providers.
Your repo comprises a full mypy.ini:
[mypy]
python_version = 3.9
warn_return_any = True
warn_unused_configs = True
disallow_untyped_defs = False
ignore_missing_imports = True

[mypy-tests.*]
disallow_untyped_defs = False

[mypy-locust.*]
ignore_missing_imports = True
What This Config Enforces
- Flags features that return Any
- Warns about unused config choices
- Does not require kind hints in all places (affordable for ML codebases)
- Skips type-checking exterior packages (frequent in ML pipelines)
- Permits untyped defs in checks
Run MyPy
poetry run mypy .
Or through Makefile:
make type-check
Why MyPy Is Essential in ML Techniques
- Prevents silent kind errors (e.g., passing an inventory the place a tensor is predicted)
- Catches config errors earlier than runtime
- Improves refactor security for big ML codebases
Utilizing a Makefile to Automate MLOps Testing and Code High quality
Your Makefile automates all key improvement duties:
make take a look at          # Run all checks
make test-unit     # Unit checks solely
make test-integration
make format        # Black + isort
make lint          # flake8
make type-check    # mypy
make load-test     # Locust efficiency checks
make clear         # Reset atmosphere
This ensures:
- Each developer makes use of the similar instructions
- CI/CD pipelines can name the identical interface
- Tooling stays constant throughout machines
Instance workflow for contributors:
make format
make lint
make type-check
make take a look at
If all instructions move, your code is clear, constant, and prepared for manufacturing.
Automating Testing with a Pytest Check Runner Script
As your ML system grows, working dozens of unit, integration, and efficiency checks manually turns into tedious and error-prone.
Lesson 2 features a absolutely automated take a look at runner (scripts/run_tests.sh) that enforces a predictable, repeatable workflow to your total take a look at suite.
This script acts like a miniature CI pipeline which you could run domestically. It prints structured logs, enforces failure circumstances, and ensures that no take a look at is by chance skipped.
Operating Automated Checks with run_tests.sh
Your repository features a absolutely purposeful take a look at runner:
#!/bin/bash
# Check Runner Script for MLOps Lesson 2
set -e
echo "🧪 Operating MLOps Lesson 2 Checks..."
# Colours for output
GREEN='�33[0;32m'
YELLOW='�33[1;33m'
RED='�33[0;31m'
NC='�33[0m'
print_status() {
echo -e "${GREEN}✅ $1${NC}"
}
print_warning() {
echo -e "${YELLOW}⚠️ $1${NC}"
}
print_error() {
echo -e "${RED}❌ $1${NC}"
}
# Run unit tests
echo ""
echo "📝 Running unit tests..."
poetry run pytest tests/unit/ -v
if [ $? -eq 0 ]; then
print_status "Unit checks handed"
else
print_error "Unit checks failed"
exit 1
fi
# Run integration checks
echo ""
echo "🔗 Operating integration checks..."
poetry run pytest checks/integration/ -v
if [ $? -eq 0 ]; then
print_status "Integration checks handed"
else
print_error "Integration checks failed"
exit 1
fi
echo ""
print_status "All checks accomplished efficiently!"
The right way to Run It
./scripts/run_tests.sh
or, through Makefile:
make take a look at
What It Does
- Runs unit checks
- Runs integration checks
- Stops instantly (set
-e) if something fails - Prints coloured output for readability
- Offers a transparent move/fail abstract
This mirrors actual CI pipelines the place a failing take a look at stops deployment.
Understanding Pytest Output and Check Outcomes
Whenever you run the script, you’ll sometimes see output like this:
🧪 Operating MLOps Lesson 2 Checks...

📝 Operating unit checks...
============================= take a look at session begins ==============================
collected 7 gadgets

checks/unit/test_inference_service.py::TestInferenceService::test_predict_returns_string PASSED
checks/unit/test_inference_service.py::TestInferenceService::test_predict_positive_input PASSED
checks/unit/test_inference_service.py::TestInferenceService::test_predict_negative_input PASSED
checks/unit/test_inference_service.py::TestDummyModel::test_model_initialization PASSED
checks/unit/test_inference_service.py::TestDummyModel::test_predict_with_good_word PASSED
checks/unit/test_inference_service.py::TestDummyModel::test_predict_with_great_word PASSED
checks/unit/test_inference_service.py::TestDummyModel::test_predict_without_keywords PASSED

============================== 7 handed in 0.45s ===============================
✅ Unit checks handed
Then integration checks:
🔗 Operating integration checks...

checks/integration/test_api_routes.py::TestHealthEndpoint::test_health_check_returns_ok PASSED
checks/integration/test_api_routes.py::TestPredictEndpoint::test_predict_positive PASSED
checks/integration/test_api_routes.py::TestAPIDocumentation::test_swagger_ui_accessible PASSED
checks/integration/test_api_routes.py::TestErrorHandling::test_nonexistent_endpoint_returns_404 PASSED

============================== 8 handed in 0.78s ===============================
✅ Integration checks handed
Lastly:
✅ All checks accomplished efficiently!
Why Automated Testing Workflows Matter in MLOps
- You see precisely which checks failed.
- You instantly know whether or not the API is wholesome.
- You construct the behavior of treating checks as a gatekeeper earlier than transport ML code.
That is foundational MLOps workflow self-discipline.
Integrating Pytest into CI/CD Pipelines
Your take a look at runner is already written as if it have been a part of CI.
Very quickly, you’ll plug this into:
- GitHub Actions
- GitLab CI
- CircleCI
- AWS CodeBuild
- Azure DevOps
A typical GitHub Actions step would appear like:
- title: Run Checks
  run: ./scripts/run_tests.sh
Since your script exits with non-zero standing on failures, the CI job fails mechanically.
What this allows in manufacturing ML workflows:
- No pull request will get merged except checks move
- Deployments are blocked if integration checks fail
- Load testing could be added as a gated step
- Check failures present early suggestions on regressions
- Groups implement constant requirements throughout builders
You have already got every little thing CI wants:
- A deterministic take a look at runner
- A strict exit-on-fail system
- Separate unit and integration take a look at layers
- Makefile wrappers for automation
- Poetry making certain repeatable environments
When you introduce CI/CD in later classes, these scripts plug in seamlessly.
Automating Load Testing in MLOps with Locust Scripts
Efficiency testing turns into important as soon as an ML API begins supporting actual site visitors. You need confidence that your inference service won’t collapse below load, that p95/p99 latencies stay acceptable, and that the system behaves predictably when scaling horizontally.
Manually working Locust is ok for experimentation, however manufacturing MLOps requires automated, repeatable load checks. Lesson 2 gives a devoted script (run_locust.sh) which lets you run efficiency checks in a single line and mechanically generate HTML reviews for evaluation.
Operating Automated Locust Load Checks with run_locust.sh
#!/bin/bash

# Easy Locust Load Testing Script for MLOps Lesson 2

set -e

echo "🚀 Beginning Locust Load Testing..."

# Configuration
HOST=${1:-"http://localhost:8000"}
USERS=${2:-10}
SPAWN_RATE=${3:-2}
RUN_TIME=${4:-"5m"}

echo "🔧 Configuration: $USERS customers, spawn charge $SPAWN_RATE, run time $RUN_TIME"

# Create reviews listing
mkdir -p reviews/locust_reports

# Verify if the API is working
echo "🏥 Checking if API is working..."
if ! curl -s "$HOST/well being" > /dev/null; then
    echo "❌ API is just not reachable at $HOST"
    echo "Please begin the API server first with: python important.py"
    exit 1
fi

echo "✅ API is reachable"

# Run Locust load take a look at
echo "🧪 Beginning load take a look at..."

TIMESTAMP=$(date +"%Ypercentmpercentd_percentHpercentMpercentS")
HTML_REPORT="reviews/locust_reports/locust_report_$TIMESTAMP.html"

poetry run locust
    -f checks/efficiency/locustfile.py
    --host="$HOST"
    --users="$USERS"
    --spawn-rate="$SPAWN_RATE"
    --run-time="$RUN_TIME"
    --html="$HTML_REPORT"
    --headless

echo "✅ Load take a look at accomplished!"
echo "📊 Report: $HTML_REPORT"
The right way to Run It
Fundamental load take a look at:
./scripts/run_locust.sh
10 customers, spawn charge 2 customers/sec, run for five minutes.
Customized parameters:
./scripts/run_locust.sh http://localhost:8000 30 5 2m
This implies:
- 30 customers whole
- 5 customers per second spawn charge
- 2-minute runtime
- Checks
/predictendpoint repeatedly (due tolocustfile.py)
What This Script Automates
- API well being verify earlier than working
- Creates timestamped report directories
- Runs Locust in headless mode
- Shops HTML reviews for evaluation
- Fails gracefully when API is unreachable
This provides you a push-button reproducible efficiency take a look at, a key requirement in skilled MLOps.
Routinely Producing Load Testing Experiences for ML APIs
Each run creates a singular HTML report:
reviews/locust_reports/
    locust_report_20251203_031331.html
    locust_report_20251203_041215.html
    ...
This file contains:
- Requests per second (RPS)
- Response time percentiles (
p50,p90,p95,p99) - Failure charges
- Whole requests
- Charts for concurrency vs efficiency
- Per-endpoint efficiency metrics
You possibly can open the report in your browser:
open reviews/locust_reports/locust_report_20251203_031331.html
(Home windows)
begin reportslocust_reportslocust_report_XXXX.html
Why This Is Necessary
Efficiency regressions are one of the crucial frequent ML service failures:
- mannequin upgrades decelerate inference unintentionally
- logging overhead will increase latency
- new preprocessing will increase CPU utilization
- {hardware} modifications alter throughput
By holding every take a look at run saved, you may evaluate historic efficiency.
That is the inspiration of automated efficiency regression detection.
Getting ready Load Testing for CI/CD and Cloud MLOps Pipelines
Your load testing script is already CI-ready.
Right here is the way it suits right into a manufacturing MLOps pipeline.
Possibility 1 — GitHub Actions
- title: Run Load Checks
  run: ./scripts/run_locust.sh http://localhost:8000 20 5 1m
For the reason that script exits non-zero on error, it turns into a gated step:
- Deployment is blocked if the API can not maintain the anticipated load.
- Solely performant builds attain manufacturing.
Possibility 2 — Nightly Efficiency Jobs
Groups typically run Locust nightly to catch degradations early:
baseline: 20 customers- alert if
p95> 300 ms - alert if failures > 1%
Experiences are archived mechanically through your script.
Possibility 3 — Cloud Load Testing (AWS/GCP/Azure)
Your script can run inside:
- AWS CodeBuild
- Azure Pipelines
- Google CloudBuild
Merely modify the host:
./scripts/run_locust.sh https://staging.mycompany.com/api 50 10 10m
Why CI Load Checks Matter
- Prevents gradual releases from being deployed
- Ensures mannequin swaps don’t tank efficiency
- Protects SLAs (Service Stage Agreements)
- Helps capability planning and autoscaling choices
- Detects bottlenecks earlier than clients do
Your repository already comprises every little thing wanted to industrialize efficiency testing.
Check Protection in MLOps: Measuring and Enhancing Code Protection
Even with robust unit, integration, and efficiency testing, you continue to want a option to quantify how a lot of your codebase is definitely exercised. That is the place take a look at protection is available in. Protection instruments present you which of them traces are examined, that are skipped, and the place hidden bugs should be lurking. That is particularly vital in ML programs, the place refined code paths (error dealing with, preprocessing, retry logic) can simply be missed.
Your Lesson 2 atmosphere contains pytest-cov, permitting you to generate detailed protection reviews in a single command.
Utilizing pytest-cov to Measure Check Protection
Protection is enabled just by including --cov flags to pytest.
Fundamental utilization:
pytest --cov=.
Your repo’s pyproject.toml installs pytest-cov mechanically below [tool.poetry.group.dev.dependencies], so protection works out of the field.
A extra detailed command:
pytest --cov=. --cov-report=term-missing
This reviews:
- whole protection share
- which traces have been executed
- which traces have been missed
- hints for bettering protection
Instance output you may see:
---------- protection: platform linux, python 3.9 ----------
Title                                Stmts   Miss  Cowl
--------------------------------------------------------
providers/inference_service.py          22      0   100%
fashions/dummy_model.py                  16      0   100%
core/config.py                         40      8    80%
core/logger.py                         15      0   100%
checks/unit/test_inference_service.py   28      0   100%
--------------------------------------------------------
TOTAL                                 121      8    93%
This provides speedy visibility into which modules want extra take a look at consideration.
The right way to Measure Code Protection in MLOps Tasks
To formally measure protection for Lesson 2, run:
pytest -v --cov=. --cov-report=html
This generates a full HTML report inside:
htmlcov/index.html
Open it in your browser:
open htmlcov/index.html
(Home windows)
begin htmlcovindex.html
The HTML report visualizes:
- executed vs missed traces
- department protection
- per-module summaries
- clickable supply code with line highlighting
That is the gold normal report format utilized in {industry} pipelines.
Integrating Protection into Your Workflow
Your Makefile may simply assist it:
make protection
However even with out that, pytest-cov provides you every little thing you have to consider take a look at completeness.
The right way to Improve Check Protection in MLOps Pipelines
ML programs typically have uncommon testing challenges:
- a number of code paths relying on information
- dynamic mannequin loading
- error circumstances that solely seem in manufacturing
- preprocessing/postprocessing steps
- branching logic primarily based on config values
- retry and timeout logic
- logging habits which may cover bugs
To extend protection meaningfully:
1. Check failure modes
Instance: mannequin not loaded, invalid enter, exceptions in service layer.
2. Check various branches
For instance., your dummy mannequin has:
if "good" in textual content or "nice" in textual content:
    return "constructive"
return "unfavorable"
Protection will increase whenever you take a look at:
- constructive department
- fallback department
- edge circumstances like empty strings
3. Check configuration-dependent habits
Since your system hundreds from:
.env- YAML
- runtime values
Strive testing situations the place every layer overrides the following.
4. Check logging paths
Logging is essential in MLOps, and making certain logs seem the place anticipated additionally contributes to protection.
5. Check the API below totally different payloads
Lacking parameters, malformed varieties, surprising values.
6. Check integration between modules
Even easy ML programs can break throughout module boundaries, so testing interactions raises protection dramatically.
Advisable Check Protection Targets for MLOps Techniques
Excessive protection is nice, however perfection is unrealistic and pointless.
Listed below are industry-grade ML-specific targets:
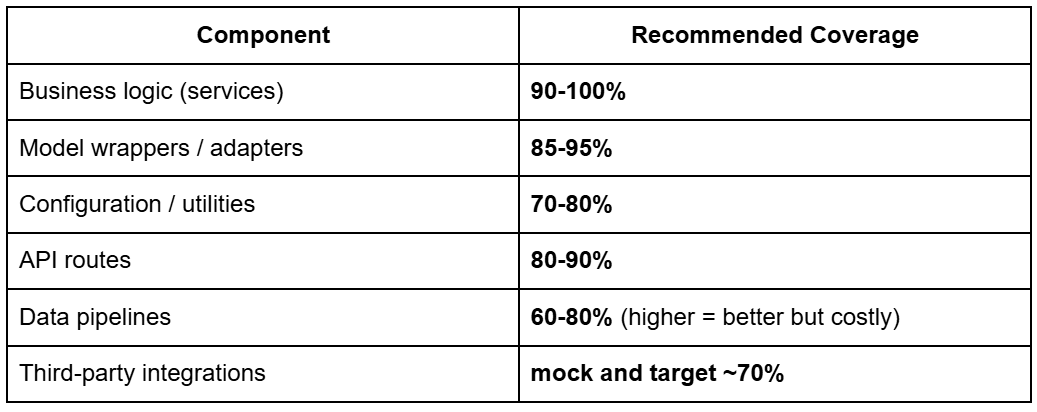
Why You Do Not Intention for 100%
- ML fashions are sometimes handled as black packing containers
- Some branches (particularly failure circumstances) are troublesome to simulate
- Efficiency code paths should not at all times sensible to check
A powerful MLOps system targets:
General protection: 80-90%
This ensures crucial logic is roofed whereas avoiding diminishing returns.
Essential paths: 100%
Inference, preprocessing, conversion, routing, security checks.
Efficiency-sensitive code: lined through load checks
This is the reason Locust enhances pytest reasonably than changing it.
What’s subsequent? We suggest PyImageSearch College.
86+ whole lessons • 115+ hours hours of on-demand code walkthrough movies • Final up to date: April 2026
★★★★★ 4.84 (128 Rankings) • 16,000+ College students Enrolled
I strongly consider that when you had the suitable trainer you might grasp pc imaginative and prescient and deep studying.
Do you assume studying pc imaginative and prescient and deep studying must be time-consuming, overwhelming, and complex? Or has to contain complicated arithmetic and equations? Or requires a level in pc science?
That’s not the case.
All you have to grasp pc imaginative and prescient and deep studying is for somebody to clarify issues to you in easy, intuitive phrases. And that’s precisely what I do. My mission is to alter training and the way complicated Synthetic Intelligence matters are taught.
In case you’re critical about studying pc imaginative and prescient, your subsequent cease needs to be PyImageSearch College, essentially the most complete pc imaginative and prescient, deep studying, and OpenCV course on-line at the moment. Right here you’ll discover ways to efficiently and confidently apply pc imaginative and prescient to your work, analysis, and initiatives. Be part of me in pc imaginative and prescient mastery.
Inside PyImageSearch College you will discover:
- &verify; 86+ programs on important pc imaginative and prescient, deep studying, and OpenCV matters
- &verify; 86 Certificates of Completion
- &verify; 115+ hours hours of on-demand video
- &verify; Model new programs launched commonly, making certain you may sustain with state-of-the-art strategies
- &verify; Pre-configured Jupyter Notebooks in Google Colab
- &verify; Run all code examples in your net browser — works on Home windows, macOS, and Linux (no dev atmosphere configuration required!)
- &verify; Entry to centralized code repos for all 540+ tutorials on PyImageSearch
- &verify; Simple one-click downloads for code, datasets, pre-trained fashions, and so forth.
- &verify; Entry on cellular, laptop computer, desktop, and so forth.
Abstract
On this lesson, you realized find out how to make ML programs secure, right, and production-ready via a full testing and validation workflow. You began by understanding why ML providers want way over “simply unit checks,” and the way a layered strategy (unit, integration, and efficiency checks) creates confidence in each the code and the habits of the system. You then explored an actual take a look at format with devoted folders, fixtures, and isolation, and noticed how every kind of take a look at validates a special piece of the pipeline.
From there, you carried out unit checks for the inference service and dummy mannequin, adopted by integration checks that train actual FastAPI endpoints, documentation routes, and error dealing with. You additionally realized find out how to carry out load testing with Locust, simulate concurrent customers, generate efficiency reviews, and interpret latency and failure metrics. That is a necessary ability for manufacturing ML APIs.
Lastly, you lined the instruments that maintain an ML codebase clear and maintainable: linting, formatting, static typing, and the Makefile instructions that tie every little thing collectively. You closed with automated take a look at runners, load-test scripts, and protection reporting, providing you with an end-to-end workflow that mirrors actual MLOps engineering follow.
By now, you might have seen how skilled ML programs are examined, validated, measured, and maintained. This units you up for the following module, the place we’ll start constructing information pipelines and reproducible ML workflows.
Quotation Data
Singh, V. “Pytest Tutorial: MLOps Testing, Fixtures, and Locust Load Testing,” PyImageSearch, S. Huot, A. Sharma, and P. Thakur, eds., 2026, https://pyimg.co/4ztdu
@incollection{Singh_2026_pytest-tutorial-mlops-testing-fixtures-locust-load-testing,
  creator = {Vikram Singh},
  title = {{Pytest Tutorial: MLOps Testing, Fixtures, and Locust Load Testing}},
  booktitle = {PyImageSearch},
  editor = {Susan Huot and Aditya Sharma and Piyush Thakur},
  12 months = {2026},
  url = {https://pyimg.co/4ztdu},
}
To obtain the supply code to this put up (and be notified when future tutorials are revealed right here on PyImageSearch), merely enter your e-mail tackle within the kind beneath!

Obtain the Supply Code and FREE 17-page Useful resource Information
Enter your e-mail tackle beneath to get a .zip of the code and a FREE 17-page Useful resource Information on Laptop Imaginative and prescient, OpenCV, and Deep Studying. Inside you will discover my hand-picked tutorials, books, programs, and libraries that will help you grasp CV and DL!
The put up Pytest Tutorial: MLOps Testing, Fixtures, and Locust Load Testing appeared first on PyImageSearch.