

Organizations that should limit entry to delicate paperwork more and more depend on AI-driven search and chat to assist workers discover solutions throughout giant repositories. Coarse-grained permissions that management entry on the data base stage work effectively for a lot of groups, however delicate paperwork require extra granular management to limit particular paperwork or folders to approved groups, people, or programs.
Doc-level entry management record (ACL) assist for Amazon Easy Storage Service (Amazon S3) data bases in Amazon Fast provides you that fine-grained management. You limit delicate S3 paperwork to solely the customers and teams who ought to see them, on the doc or folder stage. When a consumer asks a query, Fast evaluates their identification towards your ACL configuration and solely surfaces content material that they’re approved to view. With these controls in place, you may safely carry your full doc library into Fast whereas assembly your compliance and information governance necessities.
On this publish, we stroll by easy methods to configure document-level ACLs on your S3 data base in Amazon Fast. You’ll discover ways to arrange and confirm an ACL configuration that enforces document-level permissions throughout chat and automatic workflows. The publish covers:
- Controlling which S3 buckets customers can entry for data base creation utilizing IAM coverage assignments
- Planning your entry management construction
- Selecting between two ACL configuration strategies (World ACL file and document-level metadata recordsdata)
- Organising permissions for customers and teams
- Verifying that your entry controls work accurately by chat and ACL-aware Flows
- Updating and sustaining your ACL configuration over time
How S3 ACL works in Fast
You should use the S3 ACL characteristic in Amazon Fast to connect entry permissions to your paperwork in order that chat responses solely embody content material that you just’re approved to view. You specify who can entry what paperwork utilizing commonplace ALLOW and DENY insurance policies for particular person customers or teams, and Fast enforces these permissions at question time.
There are two methods to configure ACLs, every suited to totally different operational wants:
- World ACL configuration file (corresponding to ACL.json) – A single centralized file that specifies entry permissions on the folder (prefix) stage. Use this technique when your group has secure, folder-based permission buildings.
- Doc-level metadata recordsdata – Particular person metadata recordsdata alongside every doc that comprise per-document entry management entries. Use this technique when permissions change steadily, as a result of solely affected paperwork have to be reindexed relatively than total folder buildings.
Select your method based mostly on how usually permissions change and the way granular you want them to be:
| Consideration | World ACL File | Doc-level metadata |
|---|---|---|
| Permission granularity | Folder (S3 prefix) stage | Particular person doc stage |
| Administration overhead | Single file to keep up | One metadata file per doc |
| Reindex scope on permission change | Complete affected prefix | Solely the affected doc(s) |
| Beneficial for | Secure folder-based entry buildings | Ceaselessly altering per-document permissions |
Understanding reindex scope
The reindex scope of your chosen technique has significant operational implications. With the worldwide ACL method, a permission change triggers a full reindex of the affected prefix. In case your group requires frequent permission updates, think about using document-level metadata recordsdata as a substitute, the place solely the affected paperwork are reindexed relatively than total folder buildings.
Deny-by-default habits
While you allow ACLs on an S3 data base in Fast, a doc or prefix not explicitly listed in your ACL configuration is denied by default. This deny-by-default method (typically known as “fail closed,” which means the system defaults to denying entry when no express rule exists) signifies that if you happen to configure ACLs, you should explicitly grant entry to each prefix or doc you need customers to achieve.
For instance, in case your S3 bucket has three folders (/finance/, /authorized/, and /insurance policies/) and your ACL file solely grants entry to /finance/ and /insurance policies/, the /authorized/ folder and its contents are mechanically denied to everybody, even when no DENY rule exists for it.
The implicit deny mannequin utilized by IAM works the identical means. Fast denies entry except you explicitly grant it. While you configure ACLs, you might have express management over entry and nothing is inadvertently uncovered.
If a consumer or group has each an ALLOW and a DENY entry for a similar doc or prefix, the DENY all the time takes priority. Which means you need to use broad ALLOW guidelines for a staff or group after which apply focused DENY entries to limit entry to particular sources, supplying you with fine-grained management with out having to restructure your total ACL configuration.
Stipulations
Earlier than you start, confirm that you’ve the next:
- An AWS account with Amazon Fast enabled. In case you don’t have a Fast account, consult with Getting began with Amazon Fast.
- An Amazon S3 bucket containing the paperwork you wish to index.
- An thought of the way you wish to construction your entry management lists. The next sections clarify easy methods to create these recordsdata.
- Customers provisioned in Fast with e-mail addresses that match the identities in your ACL recordsdata. For particulars on provisioning customers, see Managing consumer entry in Amazon Fast.
- Fast admin entry for configuring IAM coverage assignments and data base creation.
- Familiarity with IAM ideas and primary JSON syntax.
- A take a look at or non-production data base for validating your ACL configuration. Enabling ACLs is a one-way operation that can not be reversed, so confirm your setup earlier than enabling it in manufacturing.
Controlling S3 bucket entry for data base creation
Doc-level ACLs management which paperwork customers can entry inside a data base, however they don’t management who can create data bases within the first place. Maintain this distinction in thoughts. In case your group has S3 buckets that ought to all the time require ACLs (for instance, a bucket containing delicate HR or authorized paperwork), you wish to confirm that solely approved directors can create data bases towards these buckets. With out this management, a Fast consumer can create a brand new data base on the identical bucket with out turning on ACLs, bypassing your document-level entry controls totally. This part describes easy methods to implement these controls.
IAM coverage assignments in Fast allow you to remedy this by limiting which S3 buckets particular customers or teams can entry for data base creation. For instance, you may restrict ACL-sensitive buckets to a small set of trusted directors who will all the time activate ACLs throughout setup, permit broader data base creation for non-sensitive buckets the place ACLs aren’t required, or block sure buckets from data base creation totally by not granting customers entry to them.
Word: IAM insurance policies assigned by Fast take priority over AWS resource-level insurance policies. Affirm that your IAM insurance policies meet your entry necessities earlier than assigning them.
This step is optionally available. Nevertheless, bear in mind that with out IAM coverage assignments limiting data base creation, any Fast consumer with entry to an S3 bucket might create a separate data base on that very same bucket with out enabling ACLs, successfully bypassing your document-level entry controls. Think about whether or not this threat applies to your group earlier than skipping this part.
Step 1: Create an S3 entry coverage in IAM
Create an IAM coverage within the IAM console that specifies which S3 buckets the assigned customers can entry. The next instance coverage grants entry to 2 particular buckets:
{
  "Model": "2012-10-17",
  "Assertion": [
    {
      "Effect": "Allow",
      "Action": "s3:ListAllMyBuckets",
      "Resource": "arn:aws:s3:::*"
    },
    {
      "Effect": "Allow",
      "Action": [
        "s3:ListBucket",
        "s3:ListBucketVersions",
        "s3:GetBucketLocation"
      ],
      "Useful resource": [
        "arn:aws:s3:::amzn-s3-demo-bucket1",
        "arn:aws:s3:::amzn-s3-demo-bucket2"
      ]
    },
    {
      "Impact": "Permit",
      "Motion": [
        "s3:GetObject",
        "s3:GetObjectVersion"
      ],
      "Useful resource": [
        "arn:aws:s3:::amzn-s3-demo-bucket1/*",
        "arn:aws:s3:::amzn-s3-demo-bucket2/*"
      ]
    }
  ]
}
Exchange amzn-s3-demo-bucket1 and amzn-s3-demo-bucket2 with the names of the S3 buckets that you just wish to grant entry to.
Step 2: Assign the coverage in Fast
After creating the IAM coverage, assign it to Fast customers or teams by the admin console.
To assign the coverage in Fast:
- Within the Fast admin console, beneath Permissions, select IAM coverage assignments.
- Select Add new task.
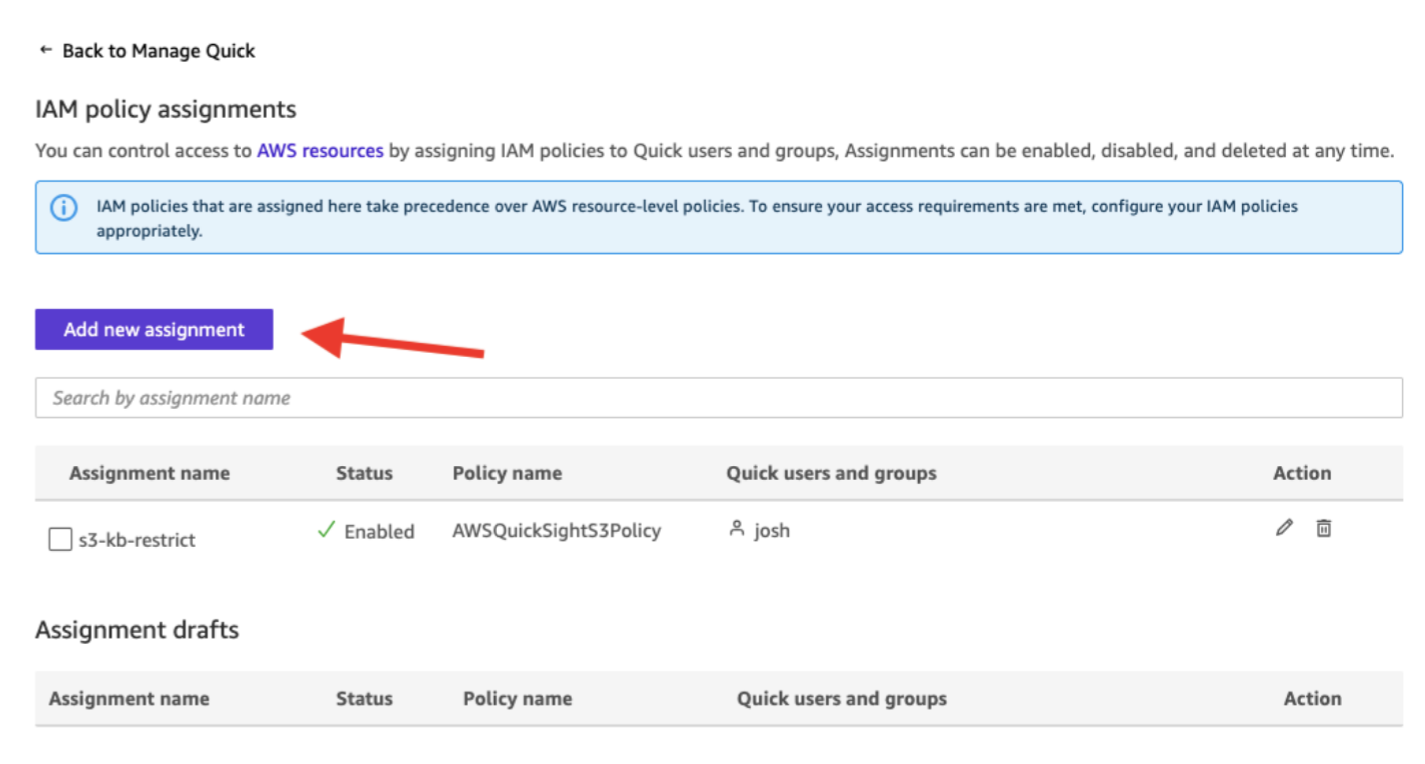
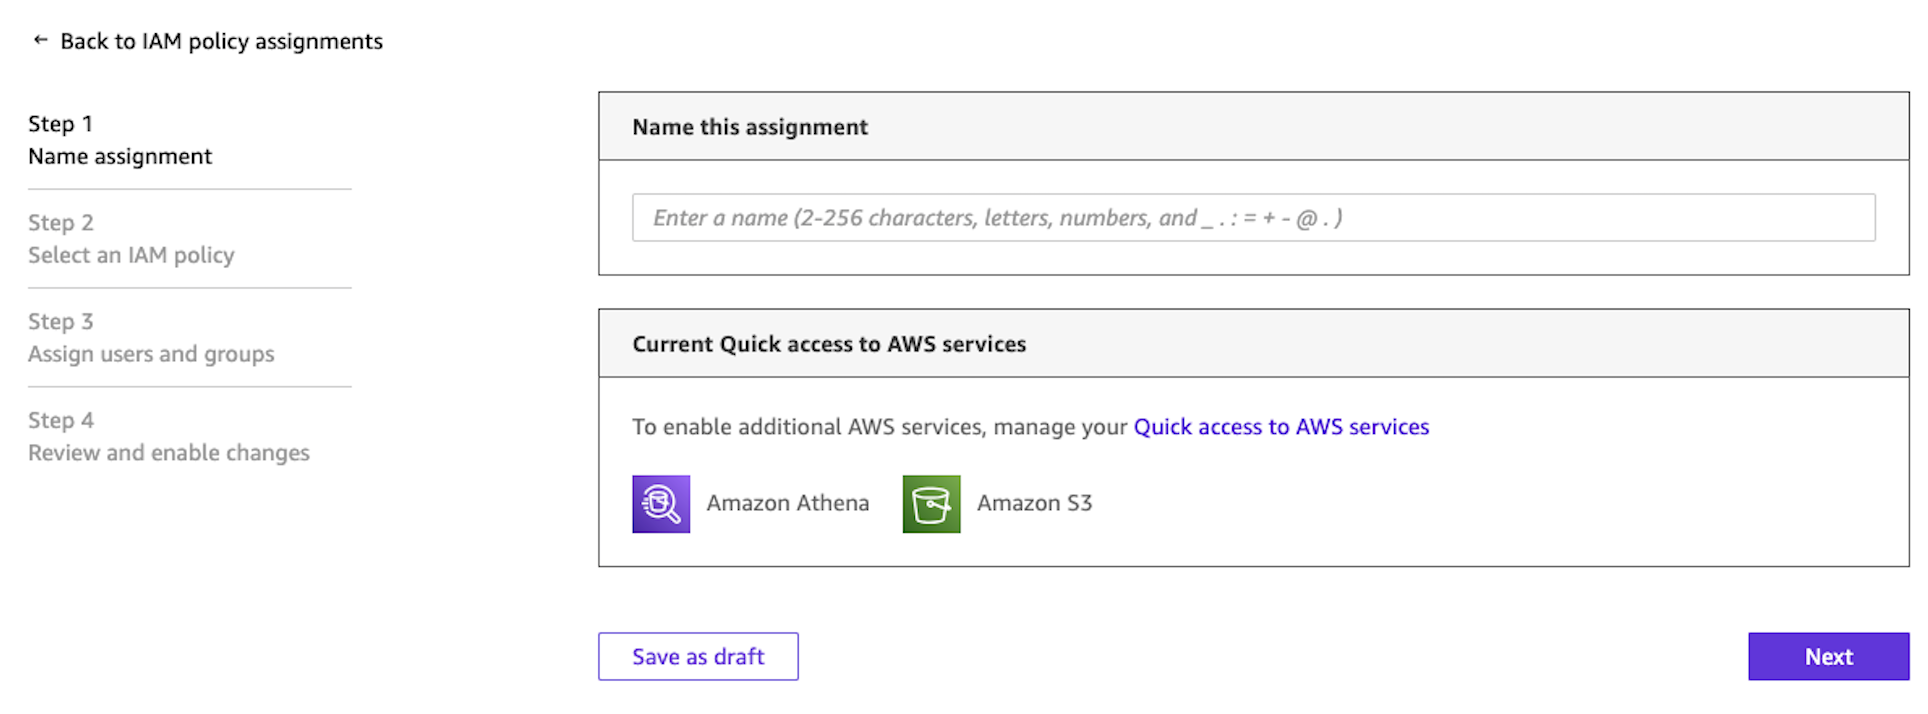
- Enter a reputation for the task (for instance,
s3-kb-restrict).
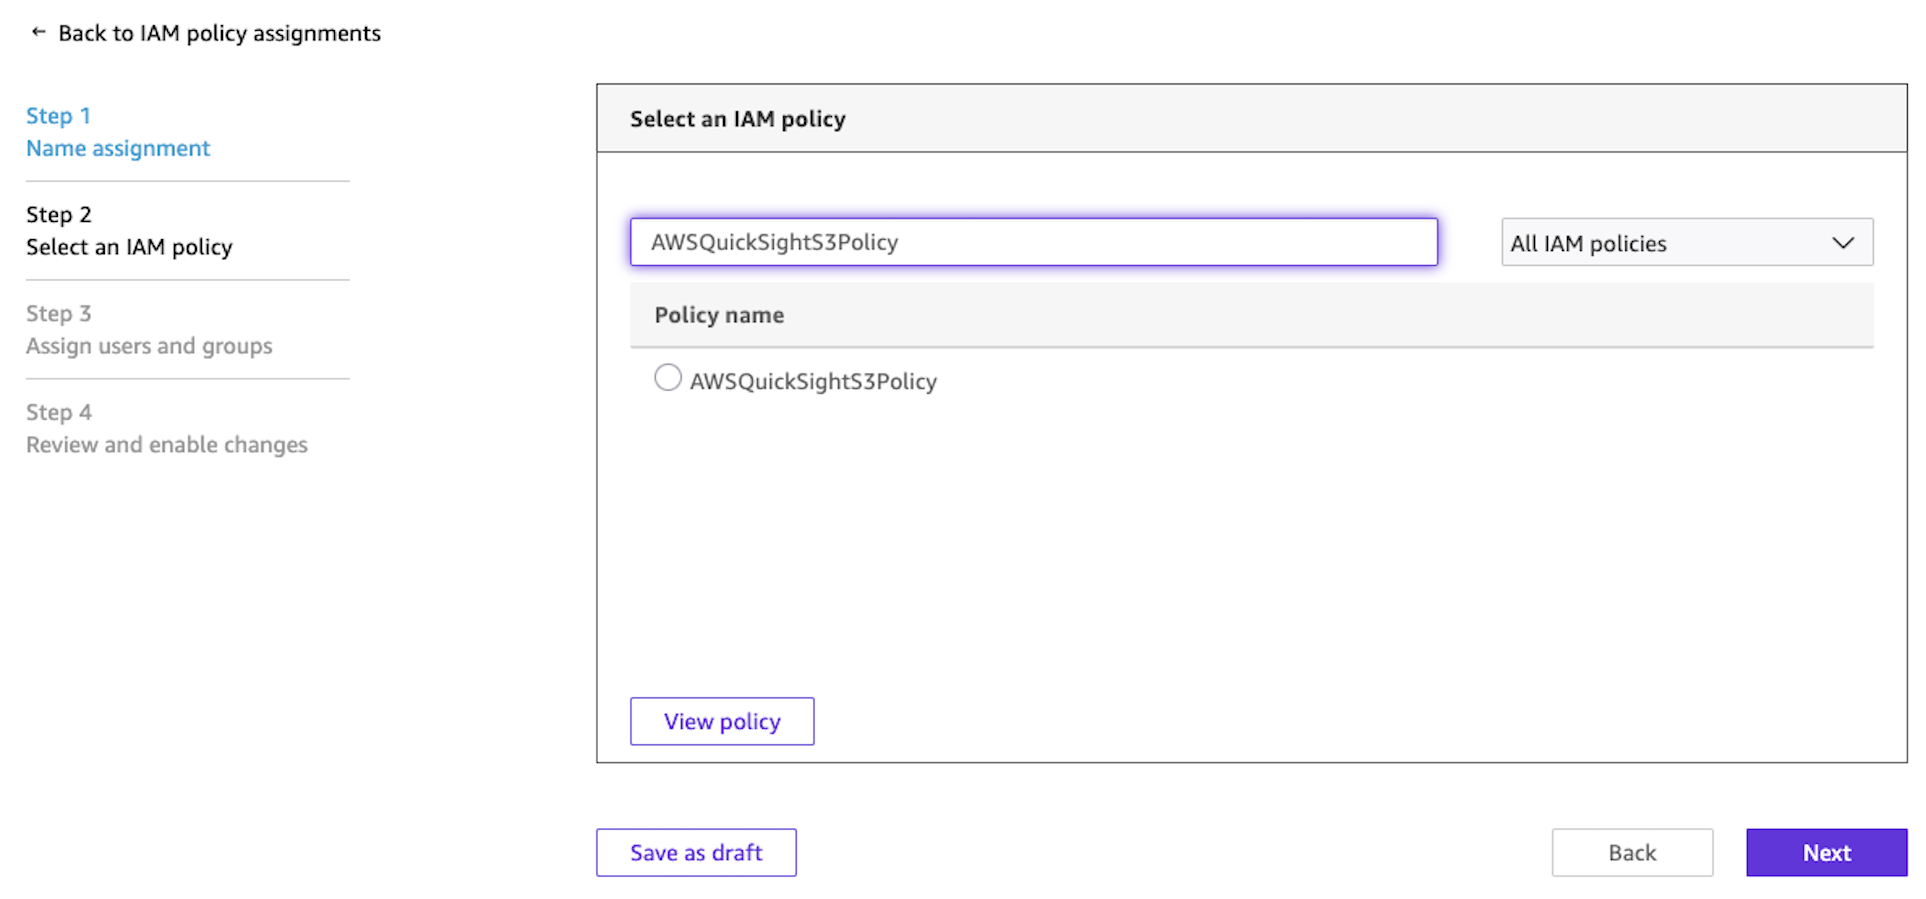
- On the Choose an IAM coverage web page, seek for and choose the IAM coverage you created in Step 1. Select Subsequent.
- On the Assign customers and teams web page, select one of many following:
- Choose Assign to customers and teams to use the coverage to present and future customers.
- Seek for and choose particular customers or teams to assign the coverage to.
- Select Subsequent.
- On the Evaluation and allow modifications web page, confirm your task particulars and select Save and allow.

Customers who aren’t explicitly granted entry by an IAM coverage task can’t use the restricted S3 buckets to create data bases. A consumer can nonetheless entry a data base shared with them. The restriction solely applies to data base creation. The IAM coverage task provides you a layer of administrative management that enhances the document-level ACLs you configure inside every data base.
For extra particulars, see Prohibit Amazon S3 bucket entry with IAM coverage assignments within the Amazon Fast documentation.
Planning your entry management construction
Earlier than creating your ACL recordsdata, decide your entry management construction. Fast enforces the permissions you configure, but it surely’s as much as you to resolve who ought to have entry to which paperwork and to construct the corresponding ACL recordsdata.
Begin by mapping your organizational entry wants. Establish which groups, roles, or people want entry to which doc units. Then select your ACL technique: a single international ACL file or ACL entries in metadata recordsdata on the document-level. Lastly, align your identities. The consumer and group names in your ACL recordsdata should match the e-mail addresses and group names of your Fast customers (e-mail matching is case-insensitive, however group names should match precisely). Group membership is managed in your Identification supplier (IdP), corresponding to IAM Identification Middle, and synced with Fast, not within the ACL recordsdata themselves.
The next examples illustrate widespread entry patterns and the way you would possibly construction them.
| Entry sample | Methodology | Instance configuration |
| Staff-wide folder entry | World ACL file | ALLOW group finance-team on s3://amzn-s3-demo-bucket/finance/ |
| Firm-wide learn entry | World ACL file | ALLOW group all-employees on s3://amzn-s3-demo-bucket/insurance policies/ |
| Single-user doc entry | Doc-level metadata | ALLOW consumer vp-eng@instance.com on roadmap-2026.pdf |
| Restricted folder (deny-by-default) | World ACL file | ALLOW group legal-team on s3://amzn-s3-demo-bucket/authorized/ (different prefixes denied by default) |
| Mixed method | Each strategies | World ACL ALLOWs hr-team on s3://amzn-s3-demo-bucket/hr/ + metadata file ALLOWs supervisor@instance.com on a particular file |
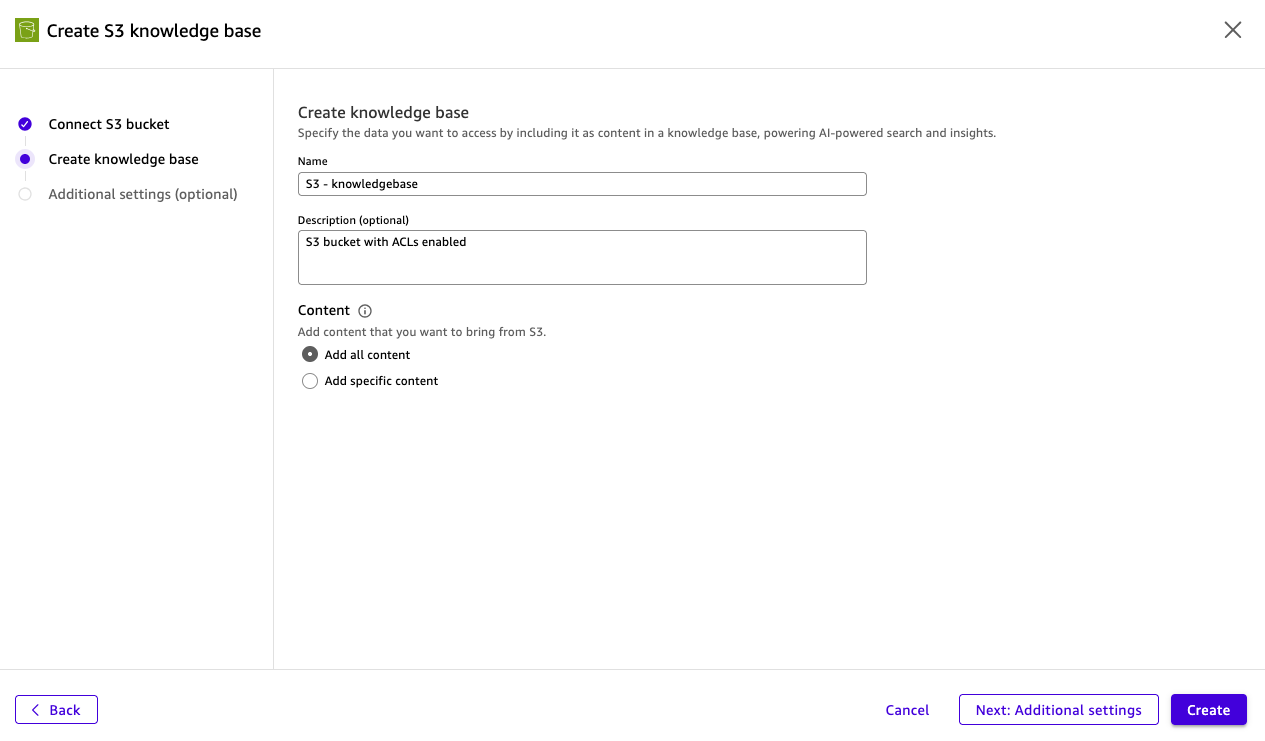
Possibility 1: Configure entry utilizing a World ACL file
⚠️ Earlier than you start: Enabling document-level ACLs on a data base is a one-way operation and might’t be reversed. If you might want to take away ACL performance later, you should create a brand new data base with out ACLs. Check your ACL configuration on a non-production data base first, as a result of this setting can’t be turned off after it’s enabled.
The worldwide ACL file is a single JSON file that maps S3 prefixes to entry management entries. Add this file to the foundation of your S3 bucket. The file doesn’t have to be named acl.json.
World ACL file construction
The file is a JSON array the place every entry specifies an S3 prefix and its related entry management entries.
Every aclEntries merchandise contains:
- Identify – The consumer e-mail tackle or group identify. This should match the identification inside Fast precisely. For instance, a consumer’s e-mail or group from IAM Identification Middle.
- Sort – Both USER or GROUP.
- Entry – Both ALLOW or DENY.
Bear in mind, prefixes not listed on this file are denied by default.
Steps to configure
- Create your acl.json file following the construction proven beforehand.
- Add the acl.json file to the foundation of your S3 bucket (the identical bucket that incorporates your paperwork).
- Within the Fast console, navigate to Data.
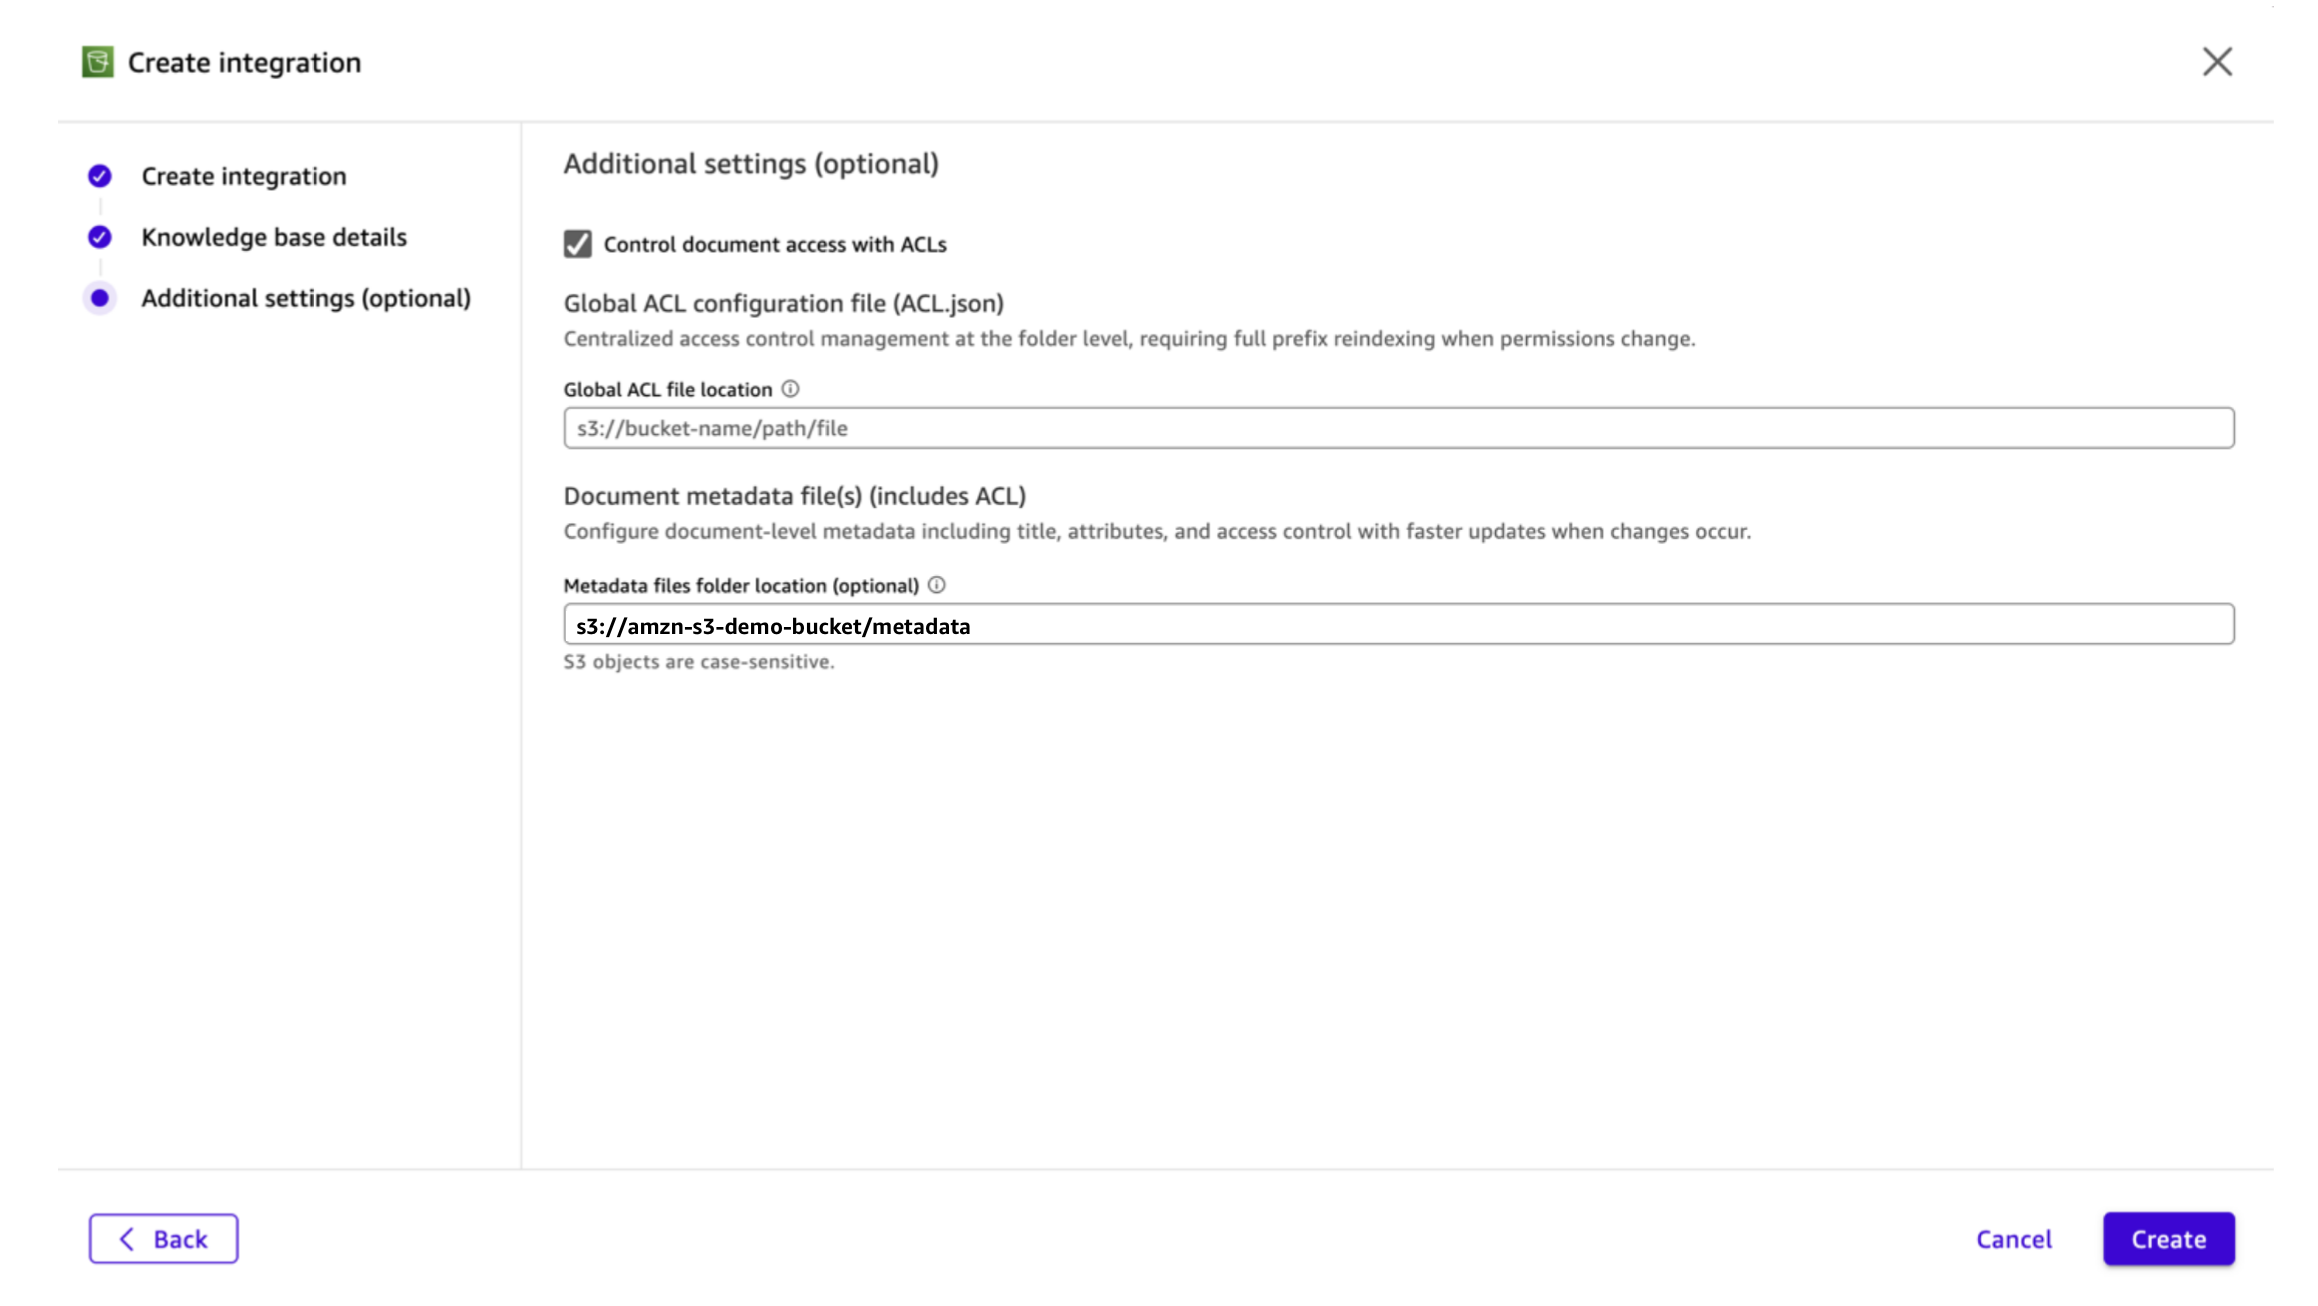
- Choose Amazon S3 as a data base and configure your S3 bucket settings.
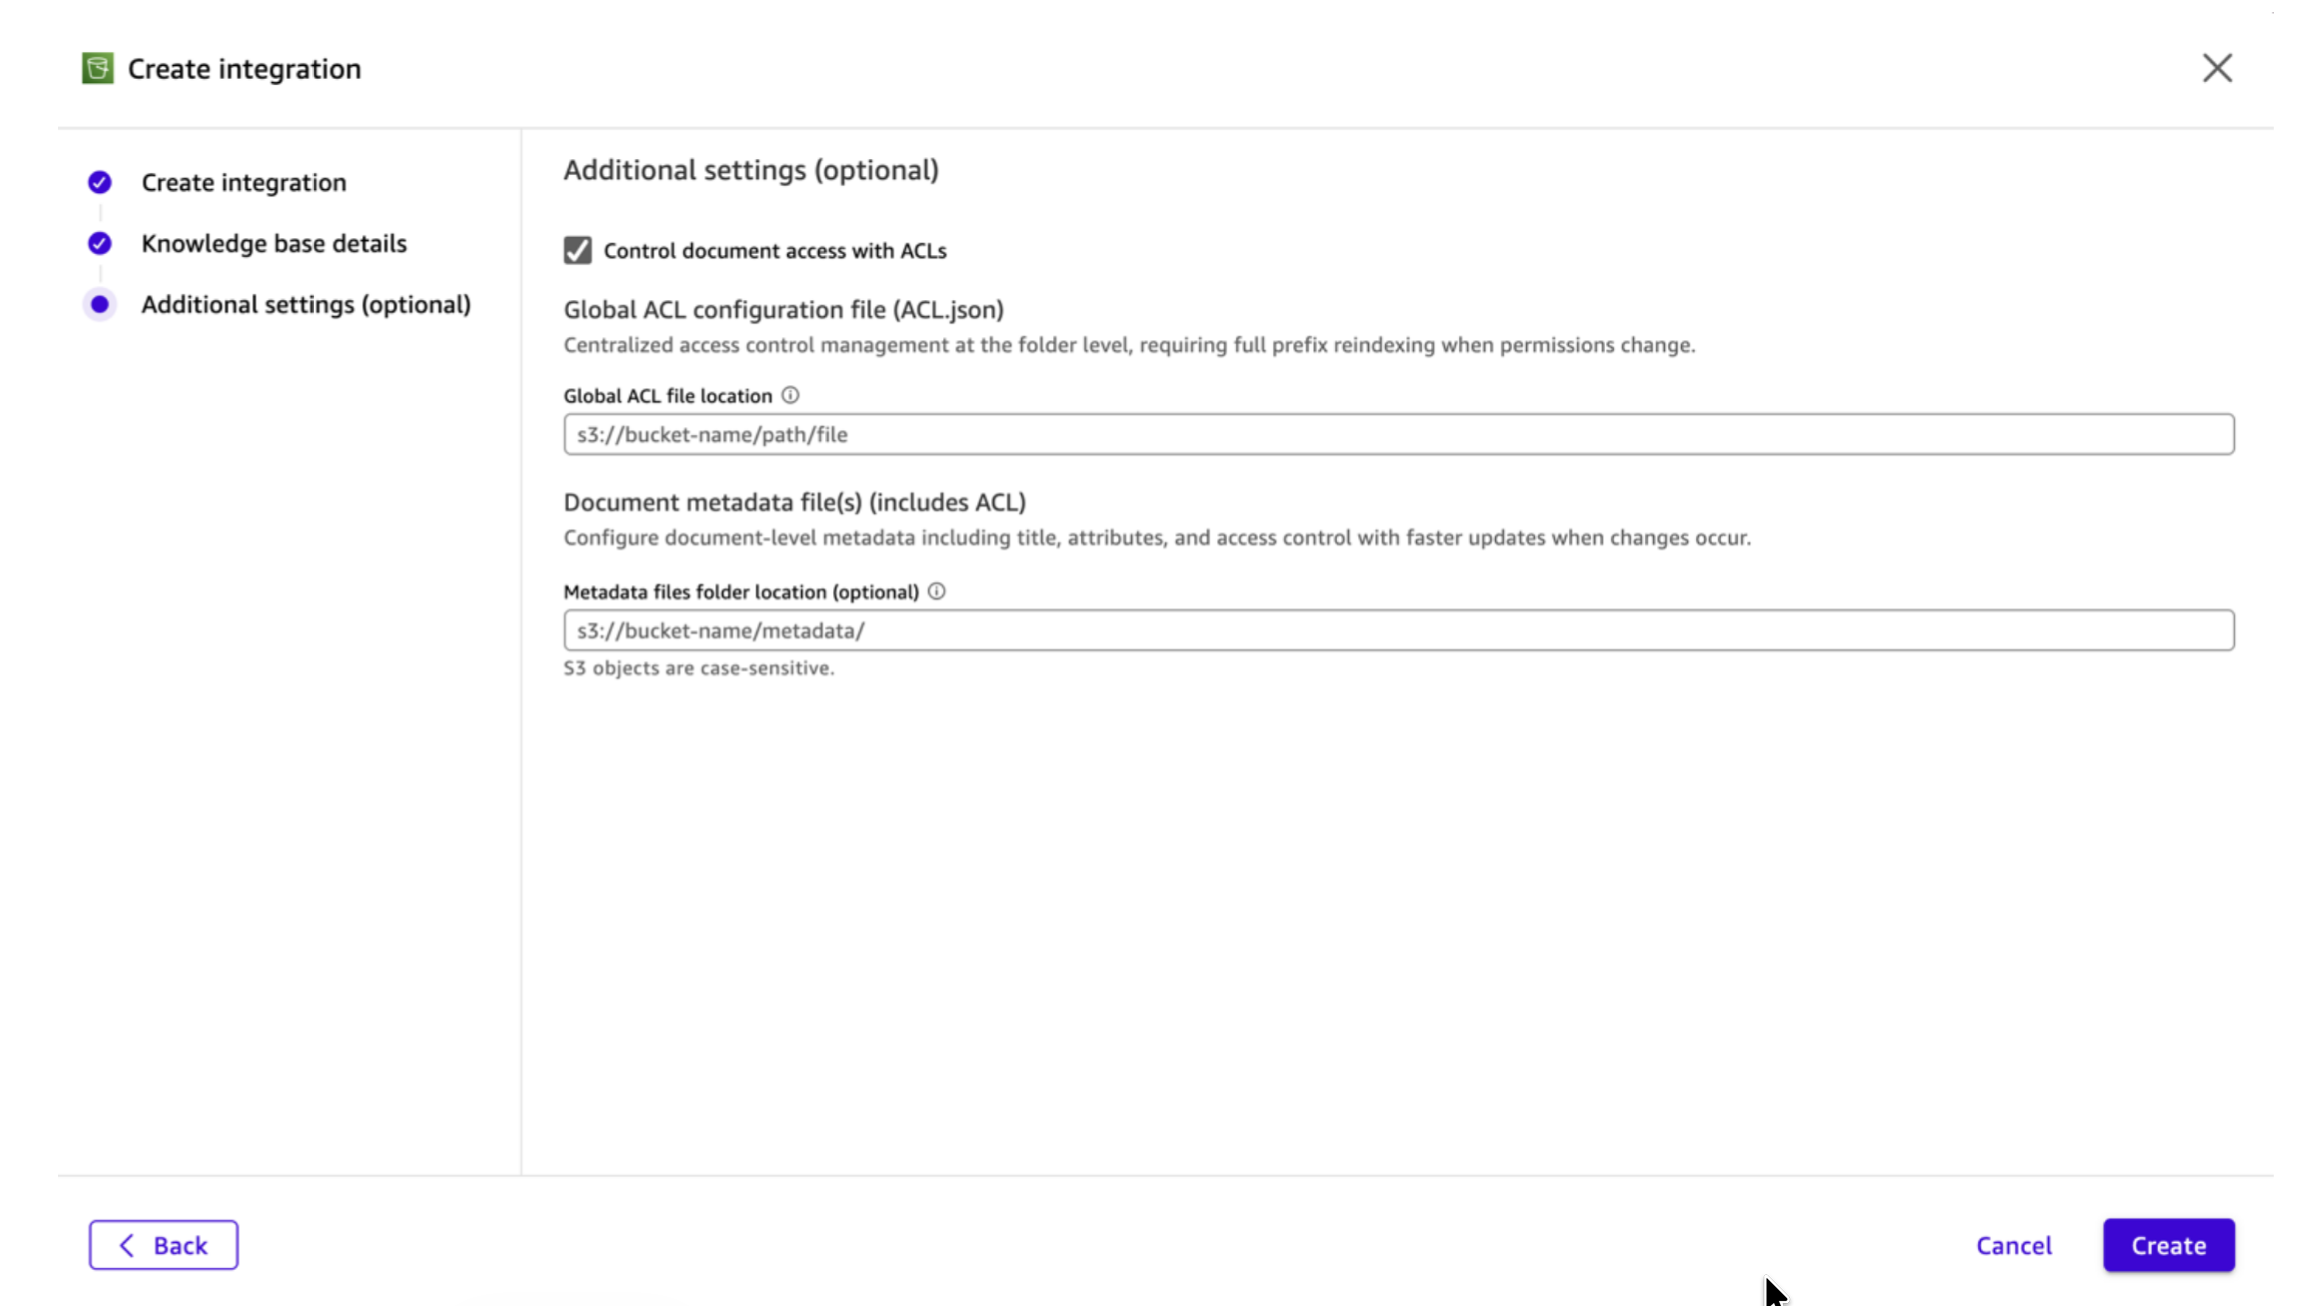
- Enter your data base particulars and select Subsequent: Extra settings.
- Underneath Extra settings, activate the Entry management record (ACL) choice.
- Within the World ACL file location subject, enter the S3 URI to your acl.json file (for instance,
s3://amzn-s3-demo-bucket/acl.json).
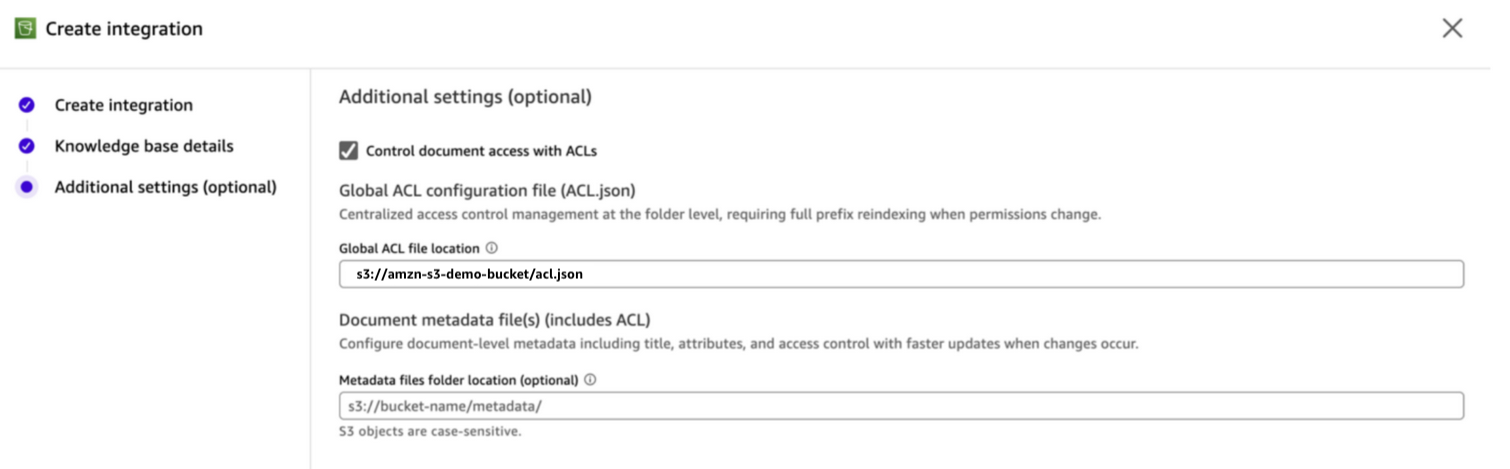
- Select Create.
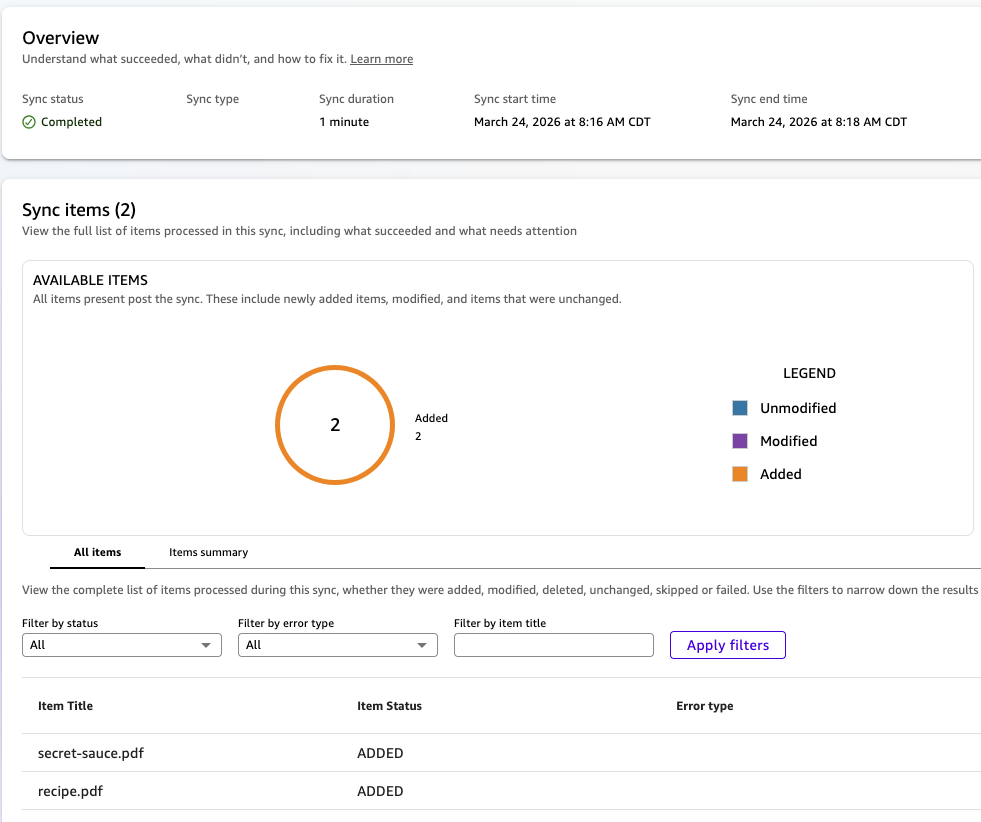
- Begin a sync to index your paperwork. Fast applies the ACL guidelines throughout indexing.
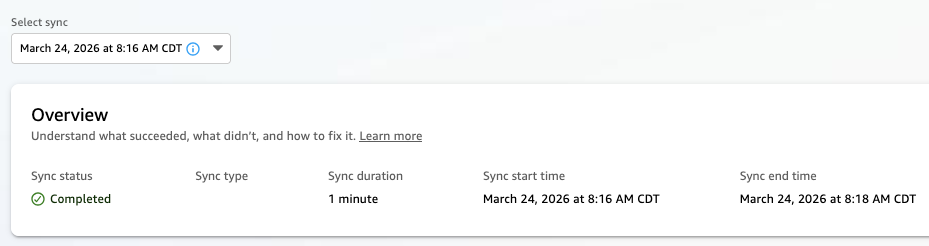
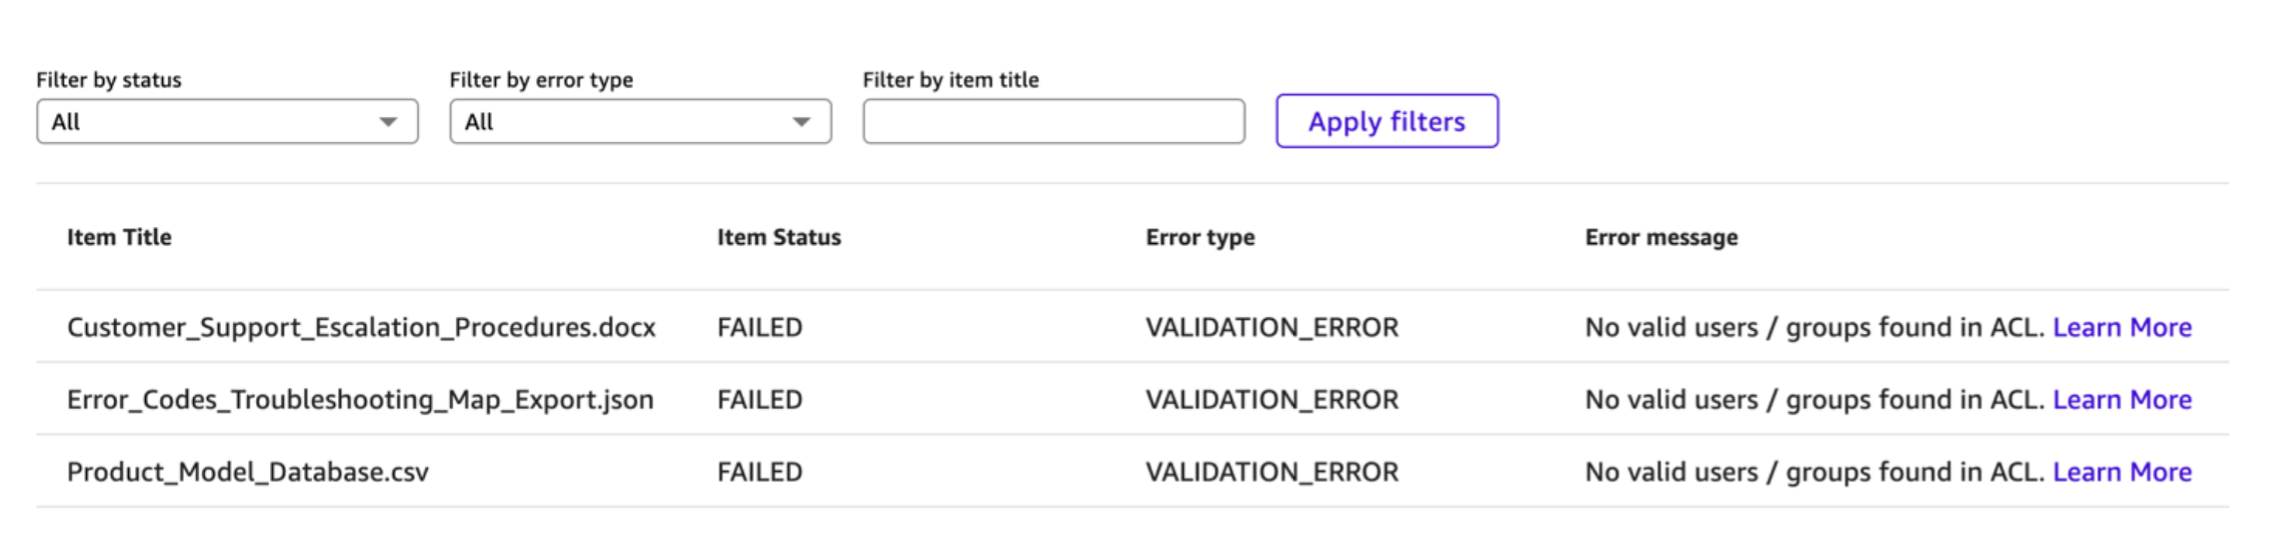
After the sync completes, solely paperwork beneath prefixes with express ALLOW entries will likely be listed and accessible in chat. You possibly can assessment the sync run report back to see which paperwork had been listed and which weren’t listed due to ACL restrictions.
Efficiently added recordsdata:
Failed recordsdata:
Possibility 2: Configure entry utilizing document-level metadata recordsdata
⚠️ Earlier than you start: Enabling document-level ACLs on a data base is a one-way operation and might’t be reversed. If you might want to take away ACL performance later, you should create a brand new data base with out ACLs. Check your ACL configuration on a non-production data base first, as a result of this setting can’t be turned off after it’s enabled.
In case you want per-document management or need sooner reindexing when permissions change, you need to use document-level metadata recordsdata. Every doc in your S3 bucket will get a corresponding metadata JSON file that features entry management entries.
Metadata file construction
Create a .metadata.json file for every doc. The metadata file should be saved in the identical S3 bucket, in a metadata folder location that you just specify throughout data base setup or as a sidecar subsequent to the precise doc being listed. We clarify the 2 choices within the following part.
The file contains an AccessControlList array. Solely the AccessControlList subject is required for ACL enforcement. The opposite fields (DocumentId, Attributes, Title, ContentType) are optionally available and used for extra metadata enrichment:
The AccessControlList entries observe the identical format as the worldwide ACL file. Every entry has a Identify, Sort (USER or GROUP), and Entry (ALLOW or DENY).
Paperwork and not using a metadata file (or with a metadata file that doesn’t embody an AccessControlList) are denied by default when ACLs are turned on.
Metadata file identify and placement
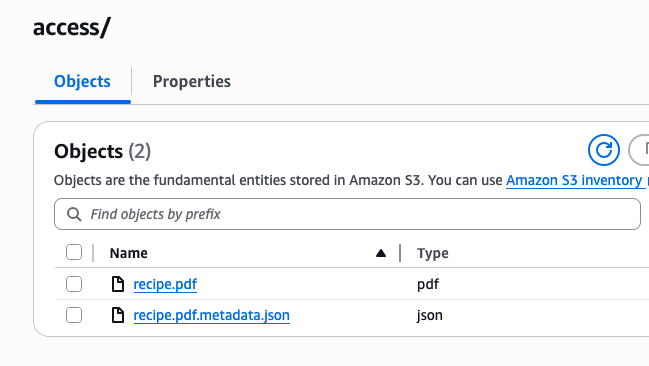
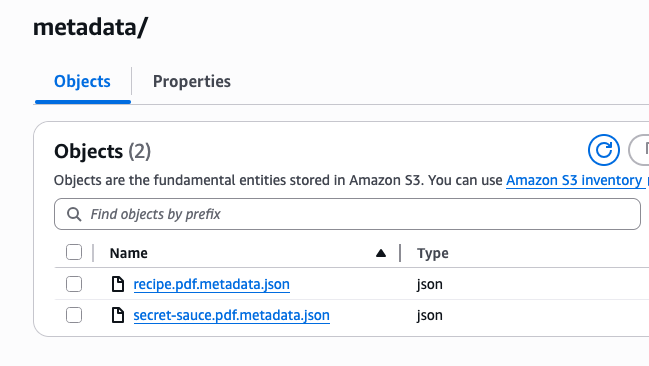
For the data base to search out the proper metadata file, the doc’s S3 secret’s appended to the metadata folder location after which suffixed with .metadata.json to construct the metadata file’s Amazon S3 path. For instance, if the file S3 secret’s recipe.pdf, the metadata file S3 key can be recipe.pdf.metadata.json.
There are two choices for the place to position your metadata recordsdata. You possibly can put them in a devoted listing (corresponding to s3://amzn-s3-demo-bucket/metadata) or in the identical folder because the referenced file.
Right here’s an instance of the recordsdata collectively in the identical folder:
One other instance with a devoted “metadata” folder:
Steps to configure
- Create a .metadata.json file for every doc that you just wish to index, together with the AccessControlList subject.
- Add the metadata recordsdata to your S3 bucket in both a devoted metadata folder or in the identical folder as every matching S3 file.
- Within the Fast console, navigate to Data.
- Choose Amazon S3 as a brand new data base.
- Underneath Extra settings, activate the entry management record (ACL) choice.
- For metadata file location, select one of many following choices:
- Similar folder choice: Go away the metadata folder location clean.
-
- Devoted folder choice: Within the Metadata folder location subject, enter the S3 URI to your metadata folder (for instance,
s3://amzn-s3-demo-bucket/metadata/).
- Devoted folder choice: Within the Metadata folder location subject, enter the S3 URI to your metadata folder (for instance,
- Select Create.
- Begin a sync. Fast reads the ACL entries from every metadata file and enforces them at question time.
Verifying your configuration
After your data base sync completes, you may confirm that ACLs are working accurately by chat and flows.
Chat
To confirm ACLs in chat:
- Open a chat in Fast and connect with your ACL-enabled data base.
- Disable net search on the backside of your chat session to isolate outcomes to your data base.
- Ask a query a couple of doc that you’ve entry to. You need to obtain a related response.
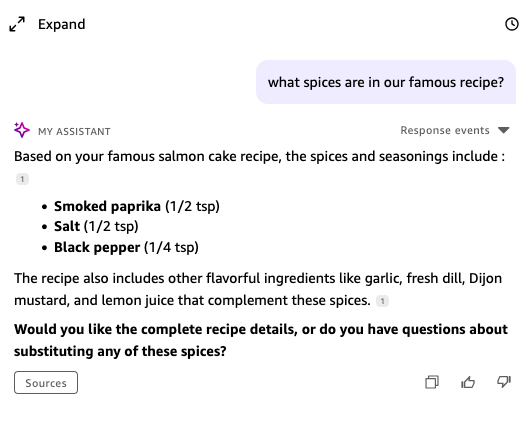
- Ask a query a couple of doc that you just don’t have entry to. Fast shouldn’t floor content material from that doc.
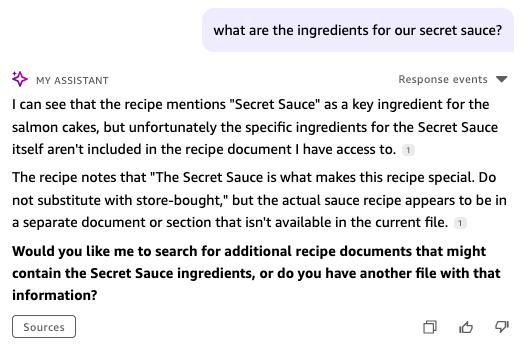
The ACL verification confirms that Fast is filtering responses based mostly in your identification and ACL configuration.
Flows
With Fast Flows and S3 ACLs, you may construct clever, permission-aware automation pipelines that respect information governance whereas delivering insights at scale.
The next instance explores a move idea: ACL-aware flows for govt summaries.
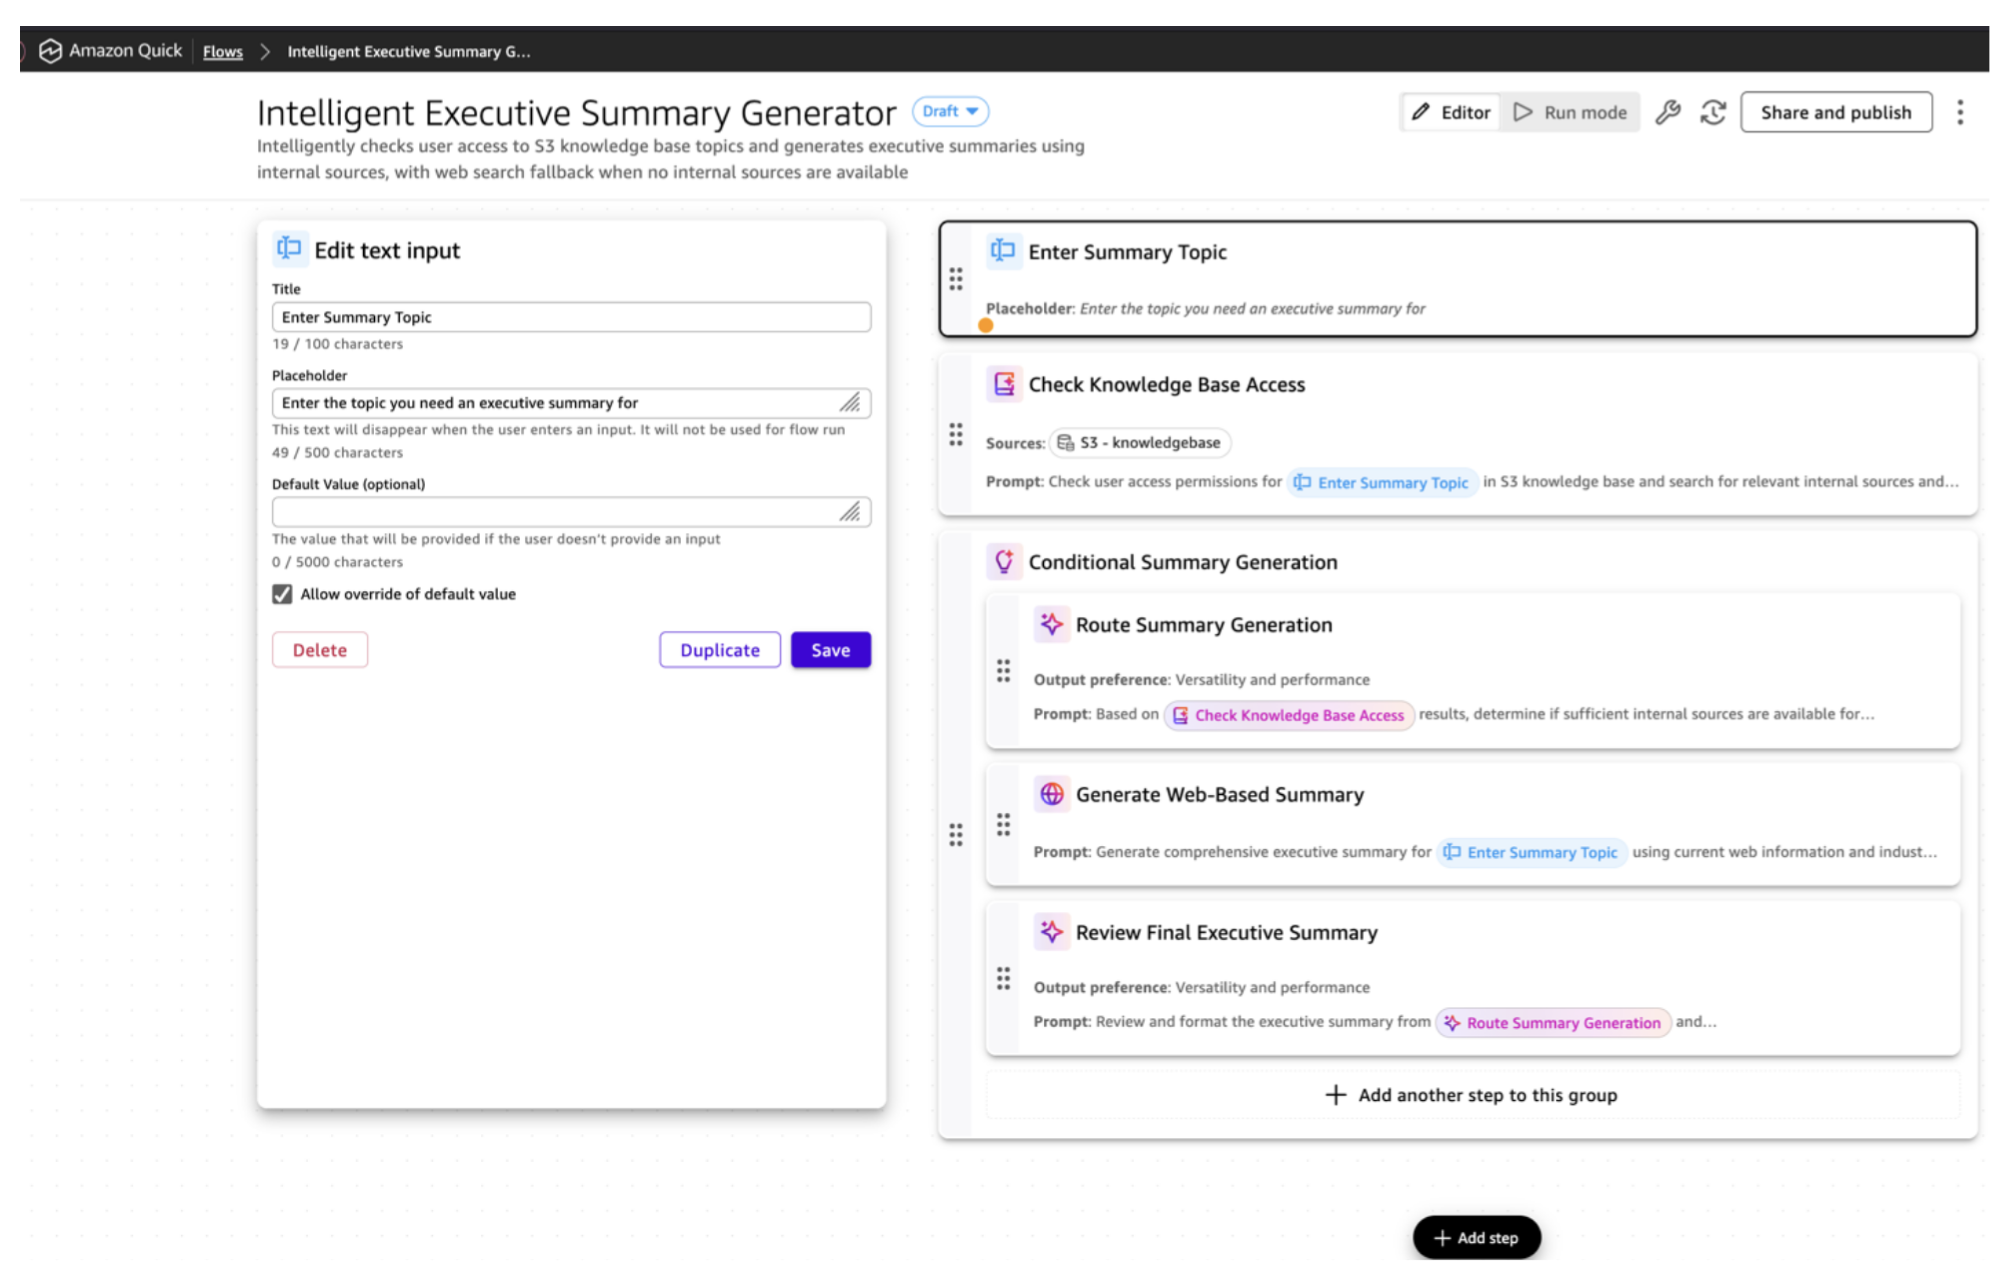
The move incorporates the next steps:
- Set off and consumer context: A consumer submits a subject utilizing the Chat or Circulation console. The move captures their identification for entry analysis.
- S3 ACL analysis: The move checks ACL configurations to find out which paperwork you may entry, imposing information governance on the automation layer.
- Inner abstract era: If approved paperwork exist, the move retrieves them and produces an govt abstract from inside sources.
- Internet search fallback: When no inside sources are accessible, the move mechanically searches the net. Exterior summaries are clearly labeled for transparency. That is an optionally available step of the Circulation.
You possibly can additional increase this use case by passing the abstract to a downstream step that creates a structured slide deck for management briefings, or by including an e-mail step to ship summaries to customers or distribution lists on a recurring schedule.
Updating ACLs after preliminary setup
When your group evolves (new hires, staff modifications, position transitions), replace your entry management configuration accordingly. Fast doesn’t monitor your ACL recordsdata for modifications in actual time. Up to date permissions take impact on the subsequent data base sync, which runs every day by default. For time-sensitive modifications corresponding to revoking entry, set off a guide sync instantly after updating your ACL recordsdata. To replace permissions:
- Replace your ACL recordsdata in S3. Modify your international ACL file or the related document-level metadata recordsdata to replicate the brand new permissions (including customers, eradicating entry, altering group memberships, and so forth).
- Resync your data base. After importing the up to date recordsdata to S3, set off a brand new sync in your data base from the Fast console. Fast re-evaluates the ACL entries in the course of the sync and updates the index accordingly.
Till the sync completes, the earlier permissions stay in impact.
The reindex scope is determined by which configuration technique you employ:
- World ACL file. The whole affected prefix is reindexed.
- Doc-level metadata. Solely the paperwork whose metadata recordsdata modified are reindexed.
In case you anticipate frequent permission modifications, document-level metadata recordsdata offer you sooner turnaround on entry updates.
Securing your ACL recordsdata
Prohibit s3:PutObject permissions in your ACL and metadata recordsdata to a restricted set of directors. Anybody who can modify these recordsdata can grant themselves entry to any doc, so deal with write entry to ACL recordsdata as a privileged operation. Allow S3 versioning in your ACL recordsdata to keep up an audit path of permission modifications. For document-level metadata recordsdata, assign possession to staff members conversant in the sensitivity of every doc set, corresponding to information house owners or safety leads, in order that permission selections keep aligned with enterprise context.
Monitoring and auditing ACL exercise
For a safety characteristic like document-level ACLs, visibility into configuration modifications and entry patterns is important. Amazon Fast gives a number of mechanisms that will help you monitor and audit your ACL-enabled data bases.
All data base create and replace actions are logged in AWS CloudTrail, together with whether or not ACLs are enabled on the data base. This provides directors an audit path of who configured ACLs and when, serving to you monitor modifications to your entry management setup and examine any surprising modifications.
Amazon Fast additionally gives a characteristic for monitoring the scale of your data bases, which may help you monitor development and detect surprising modifications in listed content material. For extra particulars, see monitor index storage utilization within the Fast documentation.
Limitations and issues
Earlier than you activate ACLs in your S3 data base, pay attention to the next:
- ACLs can’t be disabled after they’re enabled. Turning on document-level ACLs on a data base is a one-way operation. If you might want to take away ACL performance later, you should create a brand new data base with out ACLs.
- Consumer identification matching is email-based. The Identify subject in your ACL entries should precisely match the e-mail tackle related to the consumer’s Fast identification. If a consumer’s e-mail modifications, replace your ACL recordsdata and resync.
For extra limitations, see S3 information supply connector limitations and Data base ACL limitations within the Amazon Fast documentation.
Clear up sources
In case you created sources whereas following this publish and now not want them, take the next steps to keep away from ongoing expenses:
- Delete the data base. Within the Fast console, navigate to Data, choose the data base that you just created, and select Delete.
- Take away ACL and metadata recordsdata. Delete the worldwide ACL file and document-level .metadata.json recordsdata out of your S3 bucket in the event that they had been created for testing functions.
- Take away IAM insurance policies. In case you created an IAM coverage for S3 bucket entry restrictions, first take away the IAM coverage task within the Fast admin console, then delete the IAM coverage itself within the IAM console.
Conclusion
Doc-level ACLs for Amazon S3 data bases in Amazon Fast offer you granular management over who can entry particular paperwork in your data base. On this publish, you configured IAM coverage assignments to manage data base creation, deliberate an entry management construction, arrange each World ACL recordsdata and document-level metadata recordsdata, verified your configuration by chat and Flows, and realized easy methods to troubleshoot widespread points.
With these controls in place, you may confidently increase the content material in your data bases, figuring out that every consumer solely sees the paperwork and information they’re approved to entry. This helps your group get extra worth from Fast whereas assembly safety, compliance, and information governance necessities. Fast Flows extends these controls into automated workflows, checking consumer entry at runtime and producing outputs from solely the paperwork a consumer is permitted to see. With document-level ACLs, your group can confidently use AI to unlock the worth of delicate information, securely.
Subsequent steps
To proceed constructing on what you’ve realized:
- Evaluation the Amazon S3 connector documentation for detailed configuration reference.
- Learn the ACL finest practices information for suggestions on structuring your entry controls at scale.
- Strive establishing ACLs on a take a look at data base with pattern paperwork earlier than rolling out to manufacturing. Begin with a small set of paperwork and some take a look at customers, then increase when you’ve verified the configuration works as anticipated.
To be taught extra about Amazon Fast, go to the Fast product web page, discover the security measures in Fast, and be part of the Fast Group to ask questions and share your experiences.
In regards to the authors