

In my final put up, I confirmed you tips on how to use the new-and-improved desk command to create a desk and tips on how to use a few of the choices to customise the desk. On this put up I wish to introduce the gather instructions. Many Stata instructions start with gather, they usually can be utilized to create collections, customise desk layouts, format the numbers within the tables, and export tables to paperwork. There are such a lot of new gather instructions that we created a brand new Customizable Tables and Collected Outcomes Reference Guide. At the moment, I wish to present you tips on how to use a few of the gather instructions to customise the look of your tables. I’ll present you extra superior makes use of of gather in future posts.
We left off with the desk beneath close to the top of my final put up. We used the fashion() choice to format our desk utilizing one in all Stata’s predefined types. I’ve omitted the fashion() choice within the desk beneath in order that we will use a sequence of gather instructions to customise the desk ourselves.
. desk (intercourse) (highbp),
>       statistic(frequency)
>       statistic(%)
>       statistic(imply age)
>       statistic(sd age)
>       nototals
>       nformat(%9.0fc frequency)
>       sformat("%s%%" %)
>       nformat(%6.2f  imply sd)
>       sformat("(%s)" sd)

-----------------------------------------------
                       |   Hypertension
                       |          0           1
-----------------------+-----------------------
Intercourse                    |
  Male                 |
    Frequency          |      2,611       2,304
    %            |     25.22%      22.26%
    Imply               |      42.86       52.59
    Normal deviation |    (16.97)     (15.88)
  Feminine               |
    Frequency          |      3,364       2,072
    %            |     32.50%      20.02%
    Imply               |      41.62       57.62
    Normal deviation |    (16.60)     (13.26)
-----------------------------------------------
Collections, dimensions, and ranges
The desk command above mechanically created a group for us. Collections include “dimensions”, and we will view the scale in our assortment by typing gather dims.
. gather dims

Assortment dimensions
Assortment: Desk
-----------------------------------------
                   Dimension   No. ranges
-----------------------------------------
Structure, fashion, header, label
                      throughout   2
                      cmdset   1
                     colname   1
                     command   1
                      highbp   2
                      consequence   4
                         intercourse   2
                     statcmd   4
                         var   2

Type solely
                border_block   4
                   cell_type   4
-----------------------------------------
The output tells us that our assortment is known as Desk. Our assortment contains dimensions with names corresponding to throughout, colname, command, and others. The output additionally tells us the variety of ranges of every dimension.
Our assortment additionally contains the scale intercourse and highbp, that are created from our row and column variables. We will view the degrees of intercourse by typing gather levelsof intercourse.
. gather levelsof intercourse

Assortment: Desk
 Dimension: intercourse
    Ranges: 1 2
The output tells us that the dimension intercourse has ranges 1 and 2. Ranges can have labels, and we will view the labels of the dimension intercourse by typing gather label checklist intercourse.
. gather label checklist intercourse, all

  Assortment: Desk
   Dimension: intercourse
       Label: Intercourse
Degree labels:
          .m  Whole
           1  Male
           2  Feminine
The output tells us that degree 1 is labeled “Male” and degree 2 is labeled “Feminine”. The choice all within the gather label checklist command exhibits us that there’s an extra degree named .m that’s labeled “Whole”.
We will view the degrees of the dimension highbp by typing gather levelsof highbp.
. gather levelsof highbp

Assortment: Desk
 Dimension: highbp
    Ranges: 0 1
The dimension highbp has ranges 0 and 1. We will view the extent labels by typing gather label checklist highbp.
. gather label checklist highbp, all

  Assortment: Desk
   Dimension: highbp
       Label: Hypertension
Degree labels:
          .m  Whole
           0
           1
The output tells us that the extent .m is labeled “Whole”, however the ranges 0 and 1 should not have labels. We will add labels to the degrees by typing gather label ranges highbp and assigning labels to every degree.
. gather label ranges highbp 0 "No" 1 "Sure"

. gather label checklist highbp, all

  Assortment: Desk
   Dimension: highbp
       Label: Hypertension
Degree labels:
          .m  Whole
           0  No
           1  Sure
Let’s kind gather preview to view the adjustments to our desk.
. gather preview

-----------------------------------------------
                       |   Hypertension
                       |         No         Sure
-----------------------+-----------------------
Intercourse                    |
  Male                 |
    Frequency          |      2,611       2,304
    %            |     25.22%      22.26%
    Imply               |      42.86       52.59
    Normal deviation |    (16.97)     (15.88)
  Feminine               |
    Frequency          |      3,364       2,072
    %            |     32.50%      20.02%
    Imply               |      41.62       57.62
    Normal deviation |    (16.60)     (13.26)
-----------------------------------------------
The desk now shows the labels “No” and “Sure” for the degrees of highbp. The output and the desk above additionally inform us that the dimension highbp is labeled “Hypertension”. Dimensions created from variables are mechanically labeled with the variable label. We will change the label for the dimension highbp by typing gather label dim highbp after which specifying a brand new label.
. gather label dim highbp "Hypertension", modify
We will preview the change in our desk by typing gather preview.
. gather preview

-------------------------------------------
                       |     Hypertension
                       |       No       Sure
-----------------------+-------------------
Intercourse                    |
  Male                 |
    Frequency          |    2,611     2,304
    %            |   25.22%    22.26%
    Imply               |    42.86     52.59
    Normal deviation |  (16.97)   (15.88)
  Feminine               |
    Frequency          |    3,364     2,072
    %            |   32.50%    20.02%
    Imply               |    41.62     57.62
    Normal deviation |  (16.60)   (13.26)
-------------------------------------------
Or we will kind gather label checklist highbp to confirm that we have now modified the dimension label to “Hypertension”.
. gather label checklist highbp, all

  Assortment: Desk
   Dimension: highbp
       Label: Hypertension
Degree labels:
          .m  Whole
           0  No
           1  Sure
Word that we didn’t change the variable label for the variable highbp. We modified the label for the dimension highbp. This may occasionally appear complicated at first, so let’s evaluation the logic of collections.
Datasets include variables and variables can have classes. Collections, dimensions, and ranges are comparable ideas which might be used to create customized tables. A set is analogous to a dataset. A dimension is analogous to a variable. And a degree is analogous to a class of a categorical variable. Dimensions can have labels similar to variables. Ranges can have labels similar to the worth labels of the classes of a variable.
I can consider not less than two benefits of utilizing collections to label components of collections. First, collections enable us to specify customized labels for a selected desk with out altering our authentic knowledge. We might merely change the variable labels and worth labels of our variables to vary the labels in our tables. However typically we want to change the labels for some tables and never others. And we might want to use totally different labels for our graphs. Second, collections enable us to create and label dimensions that aren’t based mostly on variables in our dataset. Recall that there have been different dimensions within the output after we typed gather dims.
. gather dims

Assortment dimensions
Assortment: Desk
-----------------------------------------
                   Dimension   No. ranges
-----------------------------------------
Structure, fashion, header, label
                      throughout   2
                      cmdset   1
                     colname   1
                     command   1
                      highbp   2
                      consequence   4
                         intercourse   2
                     statcmd   4
                         var   2

Type solely
                border_block   4
                   cell_type   4
-----------------------------------------
The output tells us that there’s a dimension named consequence that has 4 ranges. Let’s kind gather label checklist consequence to be taught extra in regards to the dimension consequence.
. gather label checklist consequence, all

  Assortment: Desk
   Dimension: consequence
       Label: End result
Degree labels:
   frequency  Frequency
        imply  Imply
     %  %
          sd  Normal deviation
The output tells us that the dimension consequence is a part of the Desk assortment and has ranges named frequency, imply, %, and sd. These ranges are labeled “Frequency”, “Imply”, “%”, and “Normal deviation”, respectively.
Word that the dimension consequence just isn’t based mostly on a variable in our dataset. It was created by the statistic() choices in our desk command above.
We will kind gather label ranges to switch the extent labels for the dimension consequence
. gather label ranges consequence frequency "Freq."
>                             imply      "Imply (Age)"
>                             %   "%"
>                             sd         "SD (Age)"
>                             , modify

. gather preview

-----------------------------------
               |     Hypertension
               |       No       Sure
---------------+-------------------
Intercourse            |
  Male         |
    Freq.      |    2,611     2,304
    %    |   25.22%    22.26%
    Imply (Age) |    42.86     52.59
    SD (Age)   |  (16.97)   (15.88)
  Feminine       |
    Freq.      |    3,364     2,072
    %    |   32.50%    20.02%
    Imply (Age) |    41.62     57.62
    SD (Age)   |  (16.60)   (13.26)
-----------------------------------
Utilizing gather to customise the looks of tables
There are lots of gather instructions that we will use to customise the looks of our desk. For instance, the vertical line in our desk is a border on the suitable aspect of the primary column. We will take away the border utilizing gather fashion cell.
. gather fashion cell border_block, border(proper, sample(nil))

. gather preview

---------------------------------
                   Hypertension
                     No       Sure
---------------------------------
Intercourse
  Male
    Freq.         2,611     2,304
    %      25.22%    22.26%
    Imply (Age)    42.86     52.59
    SD (Age)    (16.97)   (15.88)
  Feminine
    Freq.         3,364     2,072
    %      32.50%    20.02%
    Imply (Age)    41.62     57.62
    SD (Age)    (16.60)   (13.26)
---------------------------------
There are lots of gather fashion instructions, together with gather fashion cell, gather fashion row, gather fashion column, and gather fashion header. We will use these instructions to customise the borders, shading, fonts, colours, and different attributes of our tables. We’ll discover these in additional element in future weblog posts.
Saving labels and types
As soon as we just like the look of our desk, we will kind gather label save to save lots of our customized labels, and we will kind gather fashion save to save lots of our customized fashion.
. gather label save MyLabels, exchange
(labels from Desk saved to file MyLabels.stjson)

. gather fashion save MyStyle, exchange
(fashion from Desk saved to file MyStyle.stjson)
Then, we will apply our labels and magnificence to future tables utilizing the fashion() and label() choices in our desk instructions.
. desk (intercourse) (highbp),
>       statistic(frequency)
>       statistic(%)
>       statistic(imply age)
>       statistic(sd age)
>       nototals
>       nformat(%9.0fc frequency)
>       sformat("%s%%" %)
>       nformat(%6.2f  imply sd)
>       sformat("(%s)" sd)
>       fashion(MyStyle, override)
>       label(MyLabels)

---------------------------------
                   Hypertension
                     No       Sure
---------------------------------
Intercourse
  Male
    Freq.         2,611     2,304
    %      25.22%    22.26%
    Imply (Age)    42.86     52.59
    SD (Age)    (16.97)   (15.88)
  Feminine
    Freq.         3,364     2,072
    %      32.50%    20.02%
    Imply (Age)    41.62     57.62
    SD (Age)    (16.60)   (13.26)
---------------------------------
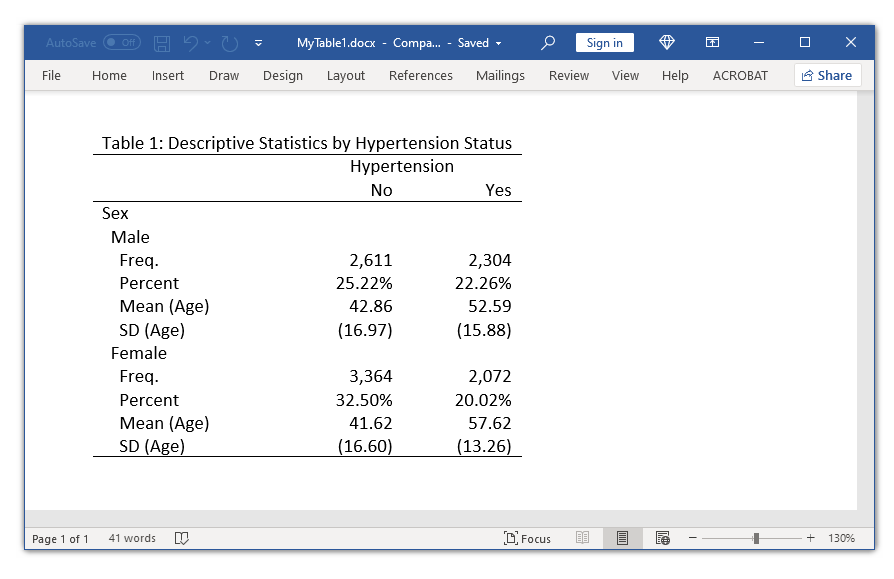
Exporting tables to paperwork with gather export
We will use gather export to export our desk to many alternative file codecs, together with Microsoft Phrase and Excel, HTML 5 with CSS information, Markdown, PDF, LaTeX, SMCL, and plain textual content.
I’ve used gather fashion putdocx within the instance beneath so as to add a title to our desk and to mechanically match the desk inside a Microsoft Phrase doc. Then, I’ve used gather export to export the desk to a Microsoft Phrase doc.
. gather fashion putdocx, format(autofitcontents)
>         title("Desk 1: Descriptive Statistics by Hypertension Standing")

. gather export MyTable1.docx, as(docx) exchange
(assortment Desk exported to file MyTable1.docx)
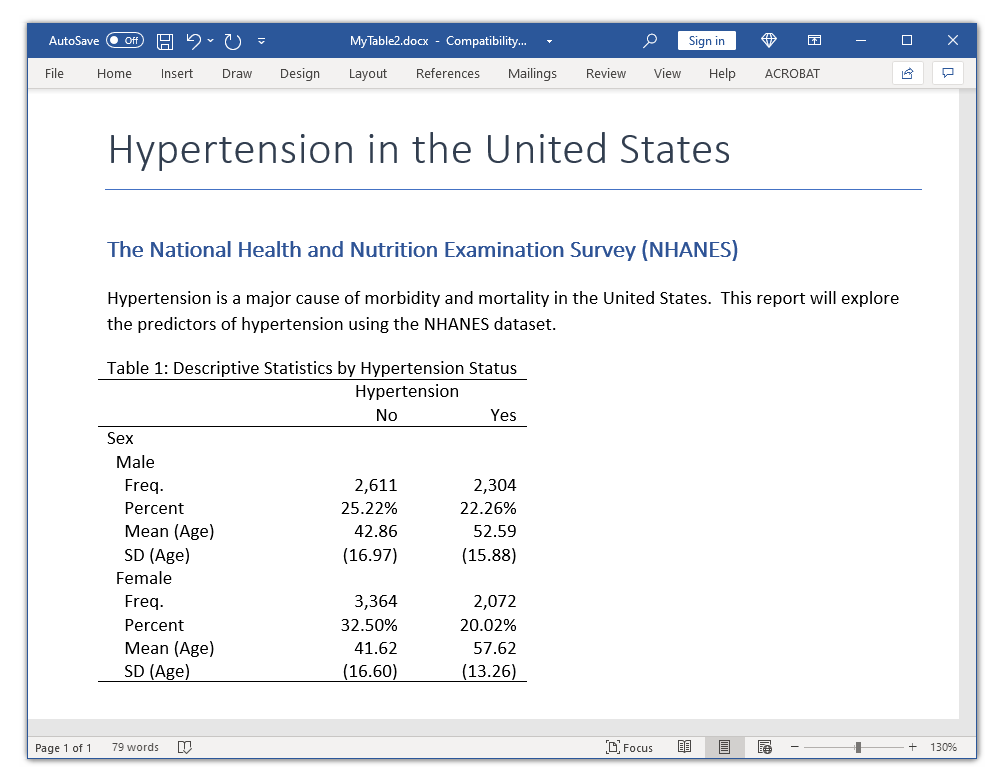
Exporting tables to paperwork with putdocx gather
Stata’s putdocx command is a strong instrument for creating refined Microsoft Phrase paperwork that embody textual content, tables, and graphs. We will additionally export our tables to those paperwork utilizing putdocx gather. I’ve used a pink font within the code block beneath to indicate you tips on how to export our desk to a Microsoft Phrase doc utilizing putdocx gather.
putdocx start
putdocx paragraph, fashion(Title)
putdocx textual content ("Hypertension in the US")
putdocx paragraph, fashion(Heading1)
putdocx textual content ("The Nationwide Well being and Diet Examination Survey (NHANES)")
putdocx paragraph
putdocx textual content ("Hypertension is a serious explanation for morbidity and mortality in ")
putdocx textual content ("the US.  This report will discover the predictors ")
putdocx textual content ("of hypertension utilizing the NHANES dataset.")
gather fashion putdocx, format(autofitcontents)                          ///
title("Desk 1: Descriptive Statistics by Hypertension Standing")
putdocx gather
putdocx save MyTable2.docx, exchange
Conclusion
We discovered loads in regards to the gather instructions, however we have now barely scratched the floor. We discovered about collections, dimensions, and ranges. We discovered tips on how to create and modify the labels of dimensions and their labels; tips on how to use gather fashion to customise the fashion of our tables; tips on how to save our labels and types and apply them to future tables; and tips on how to export our tables to paperwork.
In future weblog posts, I’ll present you tips on how to use desk and gather to re-create the examples I confirmed you at first of my final put up.
You may as well go to the Stata YouTube Channel to discover ways to create tables utilizing the desk dialog field and the Tables Builder.
Customizable tables in Stata 17
Customizable tables in Stata 17: Cross-tabulations
Customizable tables in Stata 17: One-way tables of abstract
Customizable tables in Stata 17: Two-way tables of abstract statistics
Customizable tables in Stata 17: Methods to create tables for a regression mannequin
Customizable tables in Stata 17: Methods to create tables for a number of regression fashions